
hh-mcp-comfyui
基于Model Context Protocol (MCP)的ComfyUI图像生成服务,通过API调用本地ComfyUI实例生成图片,实现自然语言生图自由
Documentation

ComfyUI MCP 服务




这是一个基于Model Context Protocol (MCP)的ComfyUI图像生成服务,通过API调用本地ComfyUI实例生成图片。
功能特性
- 通过MCP协议提供图像生成服务,实现自然语言生图自由
- 支持动态替换工作流中的提示词和尺寸等参数
- 自动加载workflows目录下的工作流文件作为资源
新增功能记录
- [2025-06-29] 支持kontext图片编辑工作流

- [2025-05-11] 支持工作流文件目录动态配置
- [2025-05-09] 增加docker构建方式,支持Python 3.12+
- [2025-05-07] 增加pip构建方式
- [2025-05-06] 把项目目录src/hh修改成src/hh_mcp_comfyui,增加uvx构建方式
- [2025-04-26] 增加图生图和移除背景样例工作流及支持图生图工具
- [2025-04-20] 加入文生图生成工具
效果
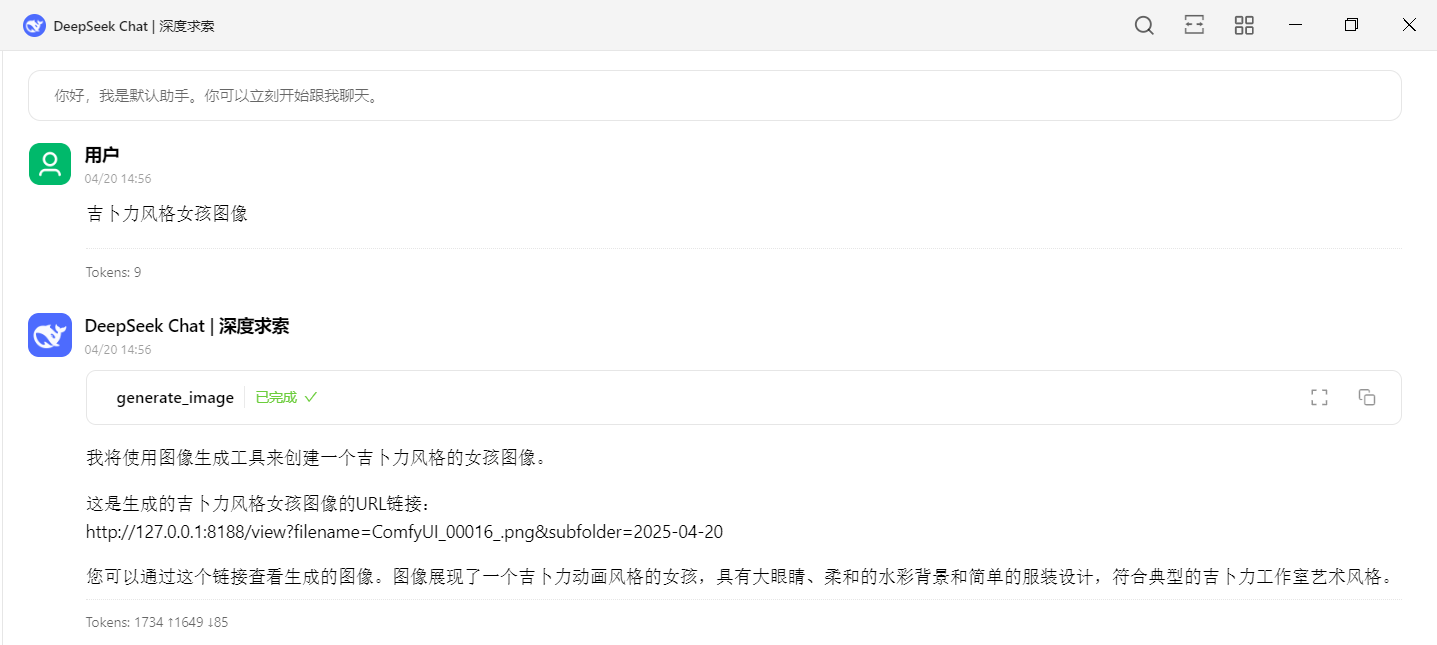
- Cherry Studio中使用效果
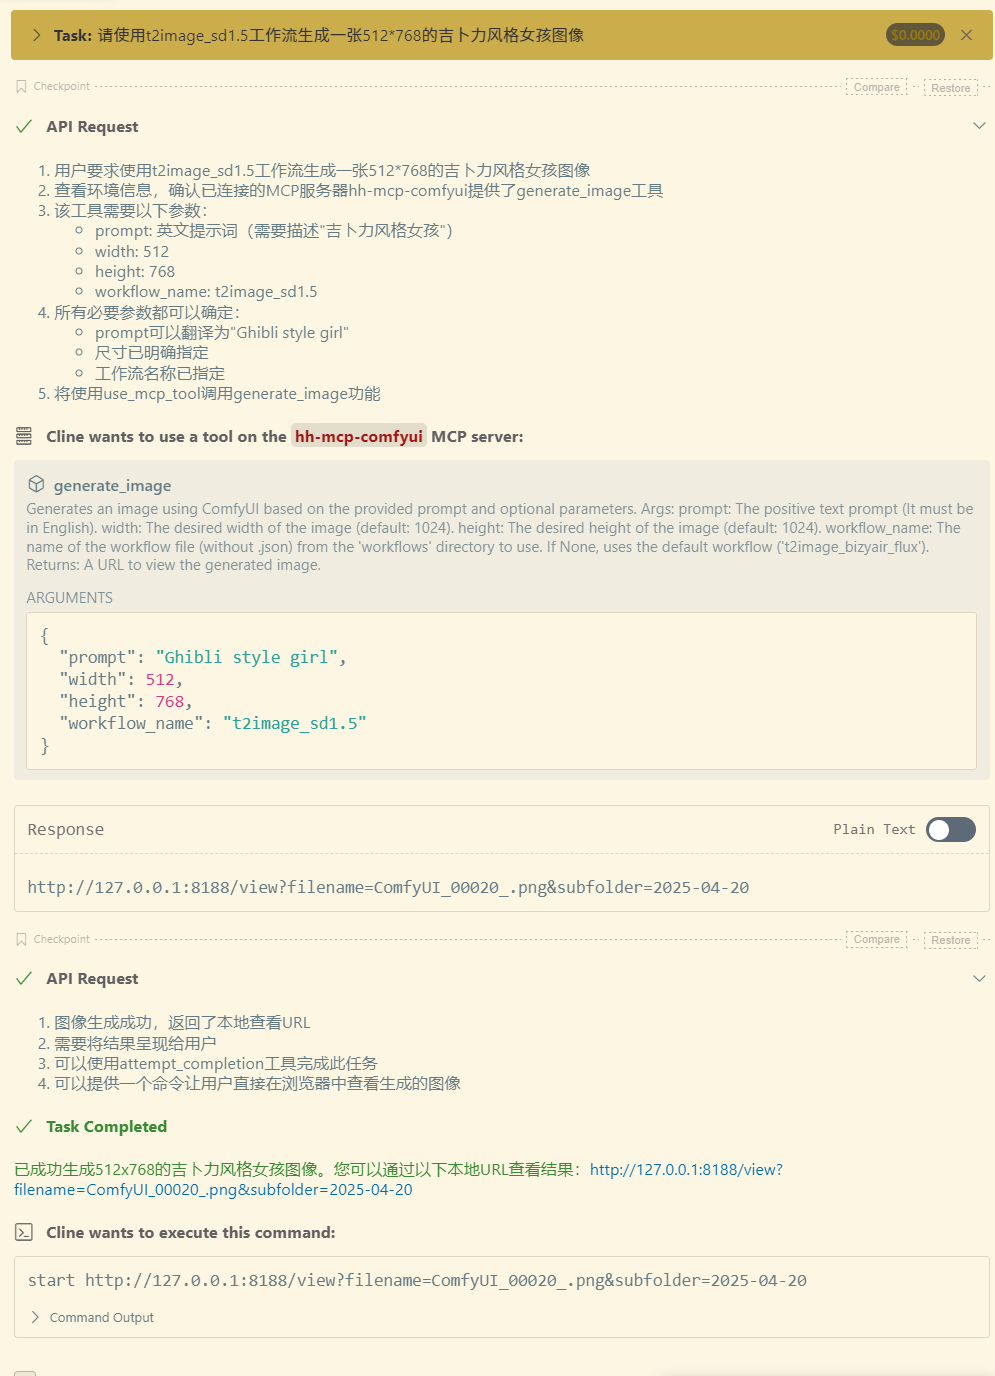
- Cline中使用效果

安装依赖
1. 确保已安装Python 3.12+
2. 使用uv管理Python环境:
- 安装uv:
# On macOS and Linux.
  $ curl -LsSf https://astral.sh/uv/install.sh | sh

  # On Windows.
  $ powershell -ExecutionPolicy ByPass -c "irm https://astral.sh/uv/install.ps1 | iex"

  # 更新uv(非必要操作):
  $ uv self update
测试运行服务
- uvx方式
$ uvx hh-mcp-comfyui

  INFO:hh_mcp_comfyui.server:Scanning for workflows in: C:\Users\tianw\AppData\Local\uv\cache\archive-v0\dp4MTo0f1qL0DdYF_BYCL\Lib\site-packages\hh_mcp_comfyui\workflows
INFO:hh_mcp_comfyui.server:Starting ComfyUI MCP Server...- pip方式
$ pip install hh_mcp_comfyui

  $ python -m hh_mcp_comfyui

  INFO:hh_mcp_comfyui.server:Scanning for workflows in: F:\Python\Python313\Lib\site-packages\hh_mcp_comfyui\workflows
  INFO:hh_mcp_comfyui.server:Starting ComfyUI MCP Server...
出现上面的信息表示服务启动成功
使用方法
> **必须确保本地ComfyUI实例正在运行(默认地址: http://127.0.0.1:8188) ComfyUI安装地址**
Cherry Studio、Cline、Cursor等客户端的使用方式
uvx MCP服务配置
{
    "mcpServers": {
      "hh-mcp-comfyui": {
        "command": "uvx",
        "args": [
          "hh-mcp-comfyui@latest"
        ],
        "env": {
          "COMFYUI_API_BASE": "http://127.0.0.1:8188",
          "COMFYUI_WORKFLOWS_DIR": "/path/hh-mcp-comfyui/workflows"
        }
      }
    }
  }
pip MCP服务配置
需要先执行命令窗口先执行:pip install hh_mcp_comfyui
{
    "mcpServers": {
      "hh-mcp-comfyui": {
        "command": "python",
        "args": [
          "-m",
          "hh_mcp_comfyui"
        ],
        "env": {
          "COMFYUI_API_BASE": "http://127.0.0.1:8188",
          "COMFYUI_WORKFLOWS_DIR": "/path/hh-mcp-comfyui/workflows"
        }
      }
    }
  }
docker MCP服务配置
前提是已安装docker
{
    "mcpServers": {
      "hh-mcp-comfyui": {
        "command": "docker",
        "args": [
            "run",
            "--net=host",
            "-v",
            "/path/hh-mcp-comfyui/workflows:/app/workflows",
            "-i",
            "--rm",
            "zjf2671/hh-mcp-comfyui:latest"
        ],
        "env": {
          "COMFYUI_API_BASE": "http://127.0.0.1:8188"
        }
      }
    }
  }
样例工作流copy到指定工作流目录:
(注意:使用下面uvx或pip方式找到你的安装工作流目录的位置把样例工作流添加进去,然后重启你的MCP服务)
- uvx
$ uvx hh-mcp-comfyui
- pip
#首先安装依赖
  $ pip install hh_mcp_comfyui
  $ python -m hh_mcp_comfyui
测试
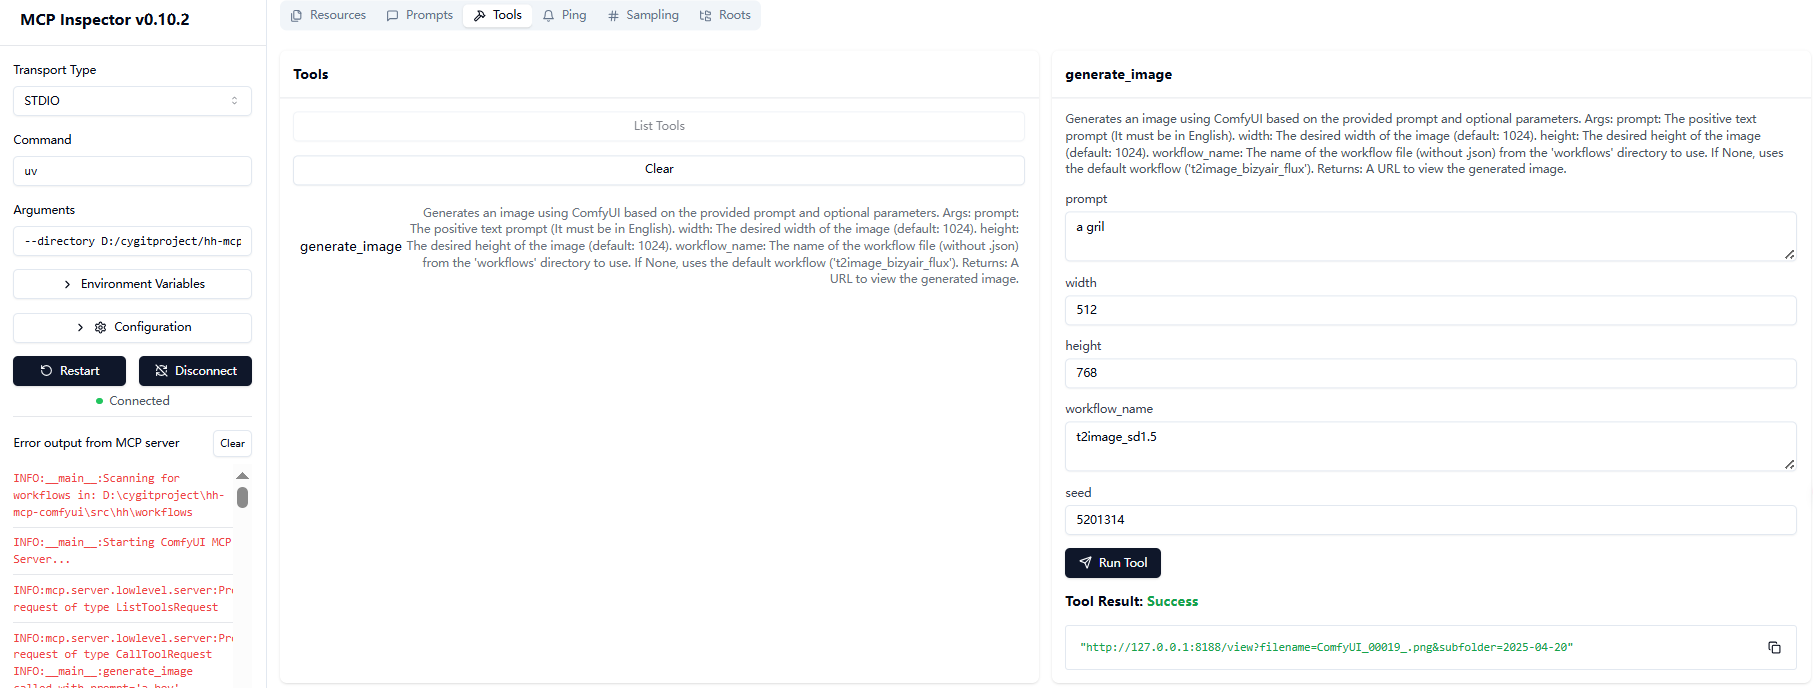
> 使用MCP Inspector测试服务端工具
- uvx方式
$ npx @modelcontextprotocol/inspector uvx hh-mcp-comfyui- pip方式
$ pip install hh_mcp_comfyui
$ npx @modelcontextprotocol/inspector python -m hh_mcp_comfyui$ npx @modelcontextprotocol/inspector docker run --net=host -i --rm zjf2671/hh-mcp-comfyui然后点击连接如图即可调试:
使用注意事项(针对没有用过comfyui的特别注意)
- 默认工作流为`t2image_bizyair_flux`
- 图片尺寸默认为1024x1024
- 服务启动时会自动加载workflows目录下的所有JSON工作流文件
- 如果你使用的是本项目中的样例工作流需要在comfyui中下载个插件,详细操作请查看:样例工作流插件安装教程
- 如果使用你本地的comfyui工作流的话,先要保证你的工作流能在comfyui正常运行,然后需要导出(API)的JSON格式,并放入到你本地的`/path/hh_mcp_comfyui/workflows`目录中
添加新工作流
1. 将工作流JSON文件放入`/path/hh_mcp_comfyui/workflows`目录中
如果是uvx和pip启动方式请看上面 《样例工作流copy到指定工作流目录》 的使用方式
2. 重启服务自动加载新工作流
开发
项目结构
.
├── .gitignore
├── .python-version
├── pyproject.toml
├── README.md
├── uv.lock
├── example/              # 示例工作流目录
│   └── workflows/
│       ├── i2image_bizyair_sdxl.json
│       ├── t2image_bizyair_flux.json
│       ├── i2image_cogview4.json
│       └── t2image_sd1.5.json
├── src/                  # 源代码目录
│   └── hh_mcp_comfyui/
│       ├── comfyui_client.py    # ComfyUI客户端实现
│       ├── server.py            # MCP服务主文件
│       └── workflows/           # 工作流文件目录
### 初始化项目开发环境:
# Clone the repository.
  $ git clone https://github.com/zjf2671/hh-mcp-comfyui.git

  $ cd hh-mcp-comfyui

  # Initialized venv
  $ uv venv

  # Activate the virtual environment.
  $ .venv\Scripts\activate

  # Install dependencies.
  $ uv lock
  Resolved 30 packages in 1ms

  # sync dependencies.
  $ uv sync
  Resolved 30 packages in 2.54s
  Audited 29 package in 0.02ms
检查服务是否正常
$ uv --directory 你本地安装目录/hh-mcp-comfyui run hh-mcp-comfyui

  INFO:__main__:Scanning for workflows in: D:\cygitproject\hh-mcp-comfyui\src\hh_mcp_comfyui\workflows
  INFO:__main__:Registered resource: workflow://t2image_bizyair_flux -> t2image_bizyair_flux.json
  INFO:__main__:Starting ComfyUI MCP Server...
使用MCP Inspector测试服务端工具
$ npx @modelcontextprotocol/inspector uv --directory 你本地安装目录/hh-mcp-comfyui run hh-mcp-comfyuiMCP配置
{
    "mcpServers": {
      "hh-mcp-comfyui": {
        "command": "uv",
        "args": [
          "--directory",
          "项目绝对路径(例如:D:/hh-mcp-comfyui)",
          "run",
          "hh-mcp-comfyui"
        ],
        "env": {
          "COMFYUI_API_BASE": "http://127.0.0.1:8188",
          "COMFYUI_WORKFLOWS_DIR": "/path/hh-mcp-comfyui/workflows"
        }
      }
    }
  }
贡献
1. Fork项目
2. 创建特性分支 (`git checkout -b feature/AmazingFeature`)
3. 提交更改 (`git commit -m 'Add some AmazingFeature'`)
4. 推送到分支 (`git push origin feature/AmazingFeature`)
5. 打开Pull Request
如有问题可以到公众号中联系我:

👆 扫码关注,发现更多好玩的!
Frequently asked questions
What is hh-mcp-comfyui?
hh-mcp-comfyui is 基于Model Context Protocol (MCP)的ComfyUI图像生成服务,通过API调用本地ComfyUI实例生成图片,实现自然语言生图自由
How do I install hh-mcp-comfyui?
Open the GitHub repository and follow its README. Most MCP servers are added to your client's MCP config, then called by your agent.
Is hh-mcp-comfyui open source?
Yes — it is hosted on GitHub at https://github.com/zjf2671/hh-mcp-comfyui and has 16 stars.
Related MCP tools
 openhands
🙌 OpenHands: Code Less, Make More for the Model Context Protocol. Enhance AI assistants with powerful integrations. Python-based implementation.
 mem0
mem0Universal memory layer for AI Agents; Announcing OpenMemory MCP - local and secure memory management. Python-based implementation.
 chatgpt-on-wechat
基于大模型搭建的聊天机器人,同时支持 微信公众号、企业微信应用、飞书、钉钉 等接入,可选择ChatGPT/Claude/DeepSeek/文心一言/讯飞星火/通义千问/ Gemini/GLM-4/Kimi/LinkAI,能处理文本、语音和图片,访问操作系统和互联网,支持基于自有知识库进行定制企业智能客服。
 gpt-researcher
An LLM agent that conducts deep research (local and web) on any given topic and generates a long report with citations. Built for the Model Context Protocol to
 fastmcp
🚀 The fast, Pythonic way to build MCP servers and clients Trusted by 19900+ developers. Trusted by 19900+ developers. Trusted by 19900+ developers.
 maxkb
maxkb🔥 MaxKB is an open-source platform for building enterprise-grade agents. MaxKB 是强大易用的开源企业级智能体平台。 for the Model Context Protocol. Enhance AI assistants with po
Run your own MCP server? See who uses it and what to fix.
Measure it with TrackMCP