
junos-mcp-server
This is a Junos Model Context Protocol (MCP) Server project that provides a bridge between MCP-compatible clients (like Claude Desktop) and Juniper Junos network devices.
Documentation
junos-mcp-server
A Model Context Protocol (MCP) server for Juniper Junos devices that enables
LLM interactions with network equipment.
Table of Contents
- junos-mcp-server
- Table of Contents
- Important Security Notice
- Important Configuration Notice
- Getting Started
- Start Junos MCP Server
- Configuration
- Docker Usage
- Junos Device Configuration
- VSCode + GitHub Copilot Integration
- Authentication for MCP Server Access
- GuardRails for Config Commit
- GuardRails for Executing Operational Commands
- Using MCP Server with Juniper Cloud-Native Router (JCNR)
- Developer Guide
Important Security Notice
> Warning: This server enables LLM access to your network infrastructure. Please review these security considerations carefully.
Security Requirements
- Corporate Policy Compliance: Only use this server if your company's
policy allows sending data of Junos devices to LLM services.
- Server Security: Always secure your Junos MCP server before deployment in
production environments.
- Authentication: Do not use password authentication for production
deployments. We strongly recommend using SSH key-based authentication for
enhanced security.
- Deployment Strategy: Until your MCP server is properly secured, only
deploy locally for testing purposes. Do not deploy remote servers in production
without proper security measures.
Security Best Practices
- Use SSH key authentication instead of passwords
- Implement proper network access controls
- Monitor and log all MCP server activities
- Regular security audits and updates
- Follow your organization's security policies
Important Configuration Notice
> Warning: The Junos MCP server supports configuration changes, but please ensure you only use this functionality when you want LLM-generated configurations to be loaded and committed on your Junos router.
**Always review the configuration being generated by the LLM and only allow tool
execution if it's the correct configuration for your use case.**
Getting Started
Get the code.
git clone https://github.com/Juniper/junos-mcp-server.git
cd junos-mcp-server
pip install -r requirements.txt
Running with uv
If you're using uv, you can run the server directly:
uv run python jmcp.py -f devices.json -t stdioStart Junos MCP Server
python3.11 jmcp.py --help
Junos MCP Server

options:
  -h, --help            show this help message and exit
  -f DEVICE_MAPPING, --device-mapping DEVICE_MAPPING
                        the name of the JSON file containing the device mapping
  -H HOST, --host HOST  Junos MCP Server host
  -t TRANSPORT, --transport TRANSPORT
                        Junos MCP Server transport
  -p PORT, --port PORT  Junos MCP Server port
Junos MCP server supports both streamable-http and stdio transport. Do not use
--host with stdio transport.
Environment Variables
- `JUNOS_TIMEOUT`: Command timeout in seconds for Junos CLI operations.
- `JMCP_POOL_IDLE_TIMEOUT`: Idle timeout in seconds for pooled SSH/NETCONF connections.
- SSH sessions are reused across tool calls via a connection pool; a background
cleanup thread (running once a minute) closes connections idle longer than this timeout.
Configuration
Config for Claude Desktop (stdio transport)
{
  "mcpServers": {
    "jmcp": {
      "type": "stdio",
      "command": "python3",
      "args": ["jmcp.py", "-f", "devices.json", "-t", "stdio"]
    }
  }
}
Config for Claude Desktop (using uv)
{
  "mcpServers": {
    "jmcp": {
      "type": "stdio",
      "command": "uv",
      "args": ["run", "python", "jmcp.py", "-f", "devices.json", "-t", "stdio"]
    }
  }
}
Note: Please provide absolute path for jmcp.py and devices.json file.
Config for Claude Desktop (Docker container)
{
  "mcpServers": {
    "jmcp": {
      "type": "stdio",
      "command": "/usr/local/bin/docker",
      "args": [
        "run",
        "--rm",
        "-i",
        "-v",
        "devices.json:/app/config/devices.json",
        "-v",
        "vsrx_keypair.pem:/app/config/vsrx_keypair.pem",
        "junos-mcp-server:latest"
      ]
    }
  }
}
Docker Usage
Build Docker Container
docker build -t junos-mcp-server:latest .Running with Default Settings
By default, the Docker container runs with stdio transport:
docker run --rm -it -v /path/to/your/devices.json:/app/config/devices.json
junos-mcp-server:latest
This uses the default command: `python jmcp.py -f /app/config/devices.json -t
stdio`
Overriding Default Arguments
You can override any arguments by specifying the full command:
For stdio transport:
docker run --rm -it -v /path/to/your/devices.json:/app/config/devices.json
junos-mcp-server:latest python jmcp.py -f /app/config/devices.json -t stdio
For streamable-http transport:
> Security: the streamable-http transport refuses to start without a valid
> `.tokens` file. Generate one with `python jmcp_token_manager.py generate
> --id ` and mount it into the container as shown below. See
> Authentication for details, or pass
> `--allow-unauthenticated-http` for loopback-only local development.
docker run --rm -it \
  -v /path/to/your/devices.json:/app/config/devices.json \
  -v /path/to/.tokens:/app/.tokens \
  -p 30030:30030 \
  junos-mcp-server:latest \
  python jmcp.py -f /app/config/devices.json -t streamable-http -H 0.0.0.0
For streamable-http with custom port:
docker run --rm -it \
  -v /path/to/your/devices.json:/app/config/devices.json \
  -v /path/to/.tokens:/app/.tokens \
  -p 8080:8080 \
  junos-mcp-server:latest \
  python jmcp.py -f /app/config/devices.json -t streamable-http -p 8080 -H 0.0.0.0
Note:
- Always mount your device configuration file using `-v /path/to/you/
devices.json:/app/config/devices.json`
- For streamable-http transport, expose the port using `-p
host_port:container_port`
- Mount any SSH private key files if using key-based authentication (e.g., `-v
/path/to/key.pem:/app/config/key.pem`)
Build docker container for Junos MCP Server
docker build -t junos-mcp-server:latest .Note: Mount your config file `devices.json` and mount any other files, in
my case I am using pem file for ssh priv key authentication so I am also
mounting vsrx_keypair.pem
Junos Device Configuration
Junos MCP server supports both `password` based auth as well as `SSH key` based
authentication (See first 2 routers configs [router-1, router-2]).
{
    "router-1": {
        "ip": "ip-addr",
        "port": 22,
        "username": "user",
        "auth": {
            "type": "password",
            "password": "pwd"
        }
    },
    "router-2": {
        "ip": "ip-addr",
        "port": 22,
        "username": "user",
        "auth": {
            "type": "ssh_key",
            "private_key_path": "/path/to/private/key.pem"
        }
    },
    "router-3": {
        "ip": "ip-addr",
        "port": 22,
        "username": "user",
        "ssh_config": "~/.ssh/config_dc",
        "auth": {
            "type": "ssh_key",
            "private_key_path": "/path/to/private/key.pem"
        }
    },
    "router-4": {
        "ip": "ip-addr",
        "port": 22,
        "username": "user",
        "ssh_config": "/home/user/.ssh/config_jumphost",
        "auth": {
            "type": "password",
            "password": "pwd"
        }
    }
}
Junos MCP server also provides support for `ProxyCommand`. (See last 2 routers
configs [router-3, router-4]), which enables you to access a target device
through an intermediary host that supports `netcat`. This is useful when you
can only log in to the target device through the intermediate host (jumphost).
This is an example of an SSH config file being used `.ssh/config_jumphost`:
# Jumphost VM Connection
Host jumphost-vm
  HostName 10.2.11.200
  User root
  # Used for MCP server
  IdentityFile /home/user/.ssh/id_rsa_claude
  IdentitiesOnly yes
  StrictHostKeyChecking no

# cRPD Devices (via jump host)
Host dt-crpd1 dtwin-crpd1 digital-twin-crpd1 clab-digital-twin-eop6-pe1
    HostName 172.20.20.11
    User claude
    IdentityFile c
    # ProxyJump jumphost-vm # Not working with JunOS MCP
    ProxyCommand ssh -l root jumphost-vm nc %h 22 2>/dev/null
    StrictHostKeyChecking no
Note #1: `Port` value should be an integer (typically `22` for SSH).
Note #2: `IdentityFile` recommendation use full path (e.g `/home/user/.ssh
/id_rsa_claude` rather than `~/.ssh/id_rsa_claude`).
VSCode + GitHub Copilot Integration
Start Your Server
python3.11 jmcp.py -f devices.json
[06/11/25 08:26:11] INFO     Starting MCP server 'jmcp-server' with transport
'streamable-http' on http://127.0.0.1:30030/mcp
INFO:     Started server process [33512]
INFO:     Waiting for application startup.
INFO:     Application startup complete.
INFO:     Uvicorn running on http://127.0.0.1:30030 (Press CTRL+C to quit)
Point to This URL in Your VSCode Config
{
    "mcp": {
        "servers": {
            "my-junos-mcp-server": {
                "url": "http://127.0.0.1:30030/mcp/"
            }
        }
    }
}
Note: You can use VSCode's `Cmd+Shift+P` to configure MCP server.
Authentication for MCP Server Access
The Junos MCP server supports token-based authentication for secure client
access when using streamable-http transport. This prevents unauthorized access
to your network infrastructure.
Authentication Behavior
- stdio transport (Claude Desktop): No authentication required - secure by
design as it runs locally
- streamable-http transport (VSCode, web clients): Token-based
authentication available
Token Management
The server includes a dedicated token management CLI tool:
`jmcp_token_manager.py`
Generate a New Token
# Basic token generation
python jmcp_token_manager.py generate --id "vscode-dev"

# With description
python jmcp_token_manager.py generate --id "vscode-dev" --description "VSCode
development environment"

# Example output:
Generated new token:
  ID: vscode-dev
  Token: jmcp_a1b2c3d4e5f6g7h8i9j0k1l2m3n4o5p6q7r8
  Description: VSCode development environment

Save this token securely - it won't be shown again!
List All Tokens
python jmcp_token_manager.py list

# Example output:
ID                   Description                              Created
-------------------------------------------------------------------------------------
vscode-dev          VSCode development environment
2025-01-28T10:30:00Z
prod-client         Production client access
2025-01-28T09:15:00Z
Show Token Value (Recovery)
python jmcp_token_manager.py show --id "vscode-dev"

# Example output:
Token ID: vscode-dev
Token: jmcp_a1b2c3d4e5f6g7h8i9j0k1l2m3n4o5p6q7r8
Description: VSCode development environment
Created: 2025-01-28T10:30:00Z
Revoke a Token
python jmcp_token_manager.py revoke --id "vscode-dev"

# Example output:
Token 'vscode-dev' has been revoked
Server Authentication Status
For the `streamable-http` transport the server fails closed: it refuses to
start unless a valid, non-empty `.tokens` file is present. The only way to
start without tokens is the explicit `--allow-unauthenticated-http` flag,
which is in turn restricted to loopback binds (`127.0.0.1`, `::1`,
`localhost`).
With tokens configured:
python jmcp.py -f devices.json -t streamable-http
INFO - Token-based authentication enabled
INFO - Clients must send 'Authorization: Bearer ' header
INFO - Use jmcp_token_manager.py to manage tokens
INFO - Streamable HTTP server started on http://127.0.0.1:30030
Without tokens configured (default - refuses to start):
python jmcp.py -f devices.json -t streamable-http
ERROR - Refusing to start streamable-http transport without authentication: .tokens file not found
ERROR - Generate a token with: python jmcp_token_manager.py generate --id
ERROR - Or, for local development on loopback only, re-run with --allow-unauthenticated-http
Explicit unauthenticated mode (loopback only, development only):
python jmcp.py -f devices.json -t streamable-http --allow-unauthenticated-http
WARNING - *** Streamable HTTP authentication is DISABLED (--allow-unauthenticated-http). .tokens file not found. Server is open to any client that can reach 127.0.0.1:30030 and can commit configuration to mapped devices. Use only for local development. ***
INFO - Streamable HTTP server started on http://127.0.0.1:30030
Combining `--allow-unauthenticated-http` with a non-loopback bind (for
example `-H 0.0.0.0`) is rejected at startup.
Client Configuration with Authentication
VSCode Configuration with Token
{
    "mcp": {
        "servers": {
            "my-junos-mcp-server": {
                "url": "http://127.0.0.1:30030/mcp/",
                "headers": {
                    "Authorization": "Bearer
                    jmcp_a1b2c3d4e5f6g7h8i9j0k1l2m3n4o5p6q7r8"
                }
            }
        }
    }
}
Testing with curl
# Test authentication with valid token
curl -X POST "http://127.0.0.1:30030/mcp/" \
  -H "Authorization: Bearer jmcp_a1b2c3d4e5f6g7h8i9j0k1l2m3n4o5p6q7r8" \
  -H "Content-Type: application/json" \
  -H "Accept: application/json, text/event-stream" \
  -d '{"jsonrpc":"2.0","id":1,"method":"tools/list","params":{}}'

# Test without token (should fail with 401)
curl -X POST "http://127.0.0.1:30030/mcp/" \
  -H "Content-Type: application/json" \
  -H "Accept: application/json, text/event-stream" \
  -d '{"jsonrpc":"2.0","id":1,"method":"tools/list","params":{}}'
Note: MCP streamable-http requires the `Accept: application/json, tex
/event-stream` header.
Docker with Authentication
When using Docker, mount the `.tokens` file to enable authentication:
# Generate token first (outside container)
python jmcp_token_manager.py generate --id "docker-client"

# Run container with token file mounted
docker run --rm -it \
  -v /path/to/devices.json:/app/config/devices.json \
  -v /path/to/.tokens:/app/.tokens \
  -p 30030:30030 \
  junos-mcp-server:latest \
  python jmcp.py -f /app/config/devices.json -t streamable-http -H 0.0.0.0
Security Best Practices
1. Token Security:
2. Access Control:
3. Network Security:
Token File Format
The `.tokens` file stores tokens in JSON format:
{
  "vscode-dev": {
    "token": "jmcp_a1b2c3d4e5f6g7h8i9j0k1l2m3n4o5p6q7r8",
    "description": "VSCode development environment",
    "created": "2025-01-28T10:30:00Z"
  },
  "prod-client": {
    "token": "jmcp_x9y8z7w6v5u4t3s2r1q0p9o8n7m6l5k4j3i2",
    "description": "Production client access",
    "created": "2025-01-28T09:15:00Z"
  }
}Important: Keep this file secure and don't commit it to version control.
GuardRails for Config Commit
The `load_and_commit_config` tool now includes a pre-commit guardrail check that validates the submitted candidate configuration against patterns in `block.cfg` before any device commit actions are attempted.
How it works
- Each non-comment line in `block.cfg` is treated as a blocked pattern.
- Pattern matching is done against normalized config lines from the submitted `config_text`.
- Patterns support regex tokens (for example to match dynamic usernames).
- If any line matches, the request is rejected and no configuration is loaded or committed.
Example `block.cfg`
# Blocked configuration prefixes/patterns for load_and_commit_config
set system root-authentication
set system login user ([^ ]+) authentication
This protects common high-risk configuration areas (for example, root authentication or unmanaged local user credential changes) from being committed by automation.
GuardRails for Executing Operational Commands
The `execute_junos_command` and `execute_junos_command_batch` tools now include command guardrails using `block.cmd`.
How it works
- Each non-comment line in `block.cmd` is treated as a regex command pattern.
- Submitted commands are normalized and checked before execution.
- If a command matches a blocked pattern, execution is rejected.
- For batch execution, the blocked command is rejected before dispatching to routers.
Example `block.cmd`
# Blocked operational command prefixes/patterns for execute_junos_command
request system reboot
request system halt
request system power-cycle
request system power-off
request system zeroize
This blocks disruptive commands (reboot/power/zeroize class actions) while still allowing read-only operational show commands.
Using MCP Server with Juniper Cloud-Native Router (JCNR)
JCNR is a cloud native router that runs on various cloud environments. One can
use this MCP server with JCNR as well by following the steps given below.
Please refer to JCNR documentation for more details on configuration.
- Configure SSH access in JCNR on a desired port other than 22. This is
required because, JCNR runs as a container on shared operating system. Running
SSH on default port is not recommended. By default SSH is enabled on port 24.
But, it is preferred to change this to desired port depending on your
networking needs.
- Enable authentication method for SSH. JCNR supports SSH key and password
based authentications.
- Enable Netconf over SSH. This is enabled by default.
set system services netconf ssh
set system services ssh port 3030
set system services ssh root-login allow
set system root-authentication encrypted-password
"$6$3vvMI$RNemhmu9izWXzO46msh38frIg4VoeFNJWJZugxgnU.NQso3OQ00QWOIZmzNePD.MWjDOD
BBEYut/W7kfADdV." (or)
set system root-authentication load-key-file
Developer Guide
This section explains the architecture of the Junos MCP server and how to
extend it with new tools.
Architecture Overview
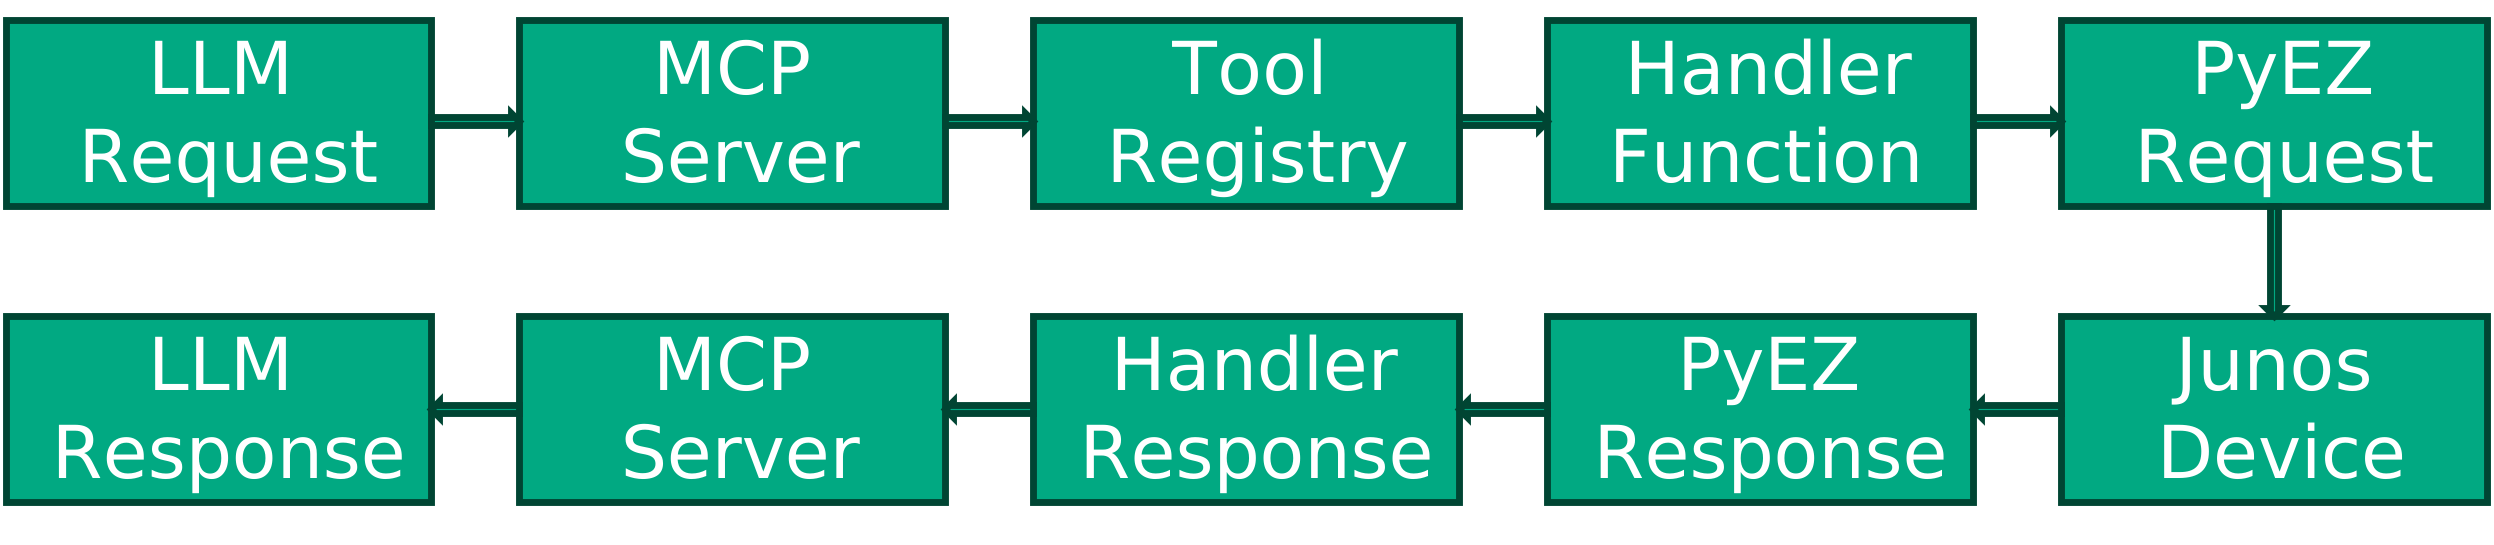
The Junos MCP server uses the Model Context Protocol (MCP) to enable LLMs to
interact with Juniper network devices. The server architecture consists of:
1. MCP Server Core (`jmcp.py`): Handles MCP protocol communication
2. Tool Handlers: Individual functions that implement specific network
operations
3. Tool Registry: Maps tool names to their handler functions
4. Transport Layer: Supports stdio (Claude Desktop) and streamable-http
(VSCode)
How Tools Work
Each tool in the MCP server follows this flow:
Adding a New Tool
Adding a new tool is a simple 3-step process:
Step 1: Create a Handler Function
Create an async handler function in `jmcp.py` (before the `TOOL_HANDLERS`
dictionary):
async def handle_my_new_tool(arguments: dict) -> list[types.ContentBlock]:
    """Handler for my_new_tool - describe what it does"""
    # Extract arguments
    router_name = arguments.get("router_name", "")
    my_param = arguments.get("my_param", "default_value")

    # Validate router exists
    if router_name not in devices:
        result = f"Router {router_name} not found in the device mapping."
    else:
        # Your tool logic here
        log.debug(f"Executing my_new_tool on router {router_name}")
        result = _run_junos_cli_command(router_name, f"show {my_param}")

    return [types.TextContent(type="text", text=result)]
Step 2: Register the Handler
Add your handler to the `TOOL_HANDLERS` dictionary (around line 330):
TOOL_HANDLERS = {
    "execute_junos_command": handle_execute_junos_command,
    "get_junos_config": handle_get_junos_config,
    "junos_config_diff": handle_junos_config_diff,
    "gather_device_facts": handle_gather_device_facts,
    "get_router_list": handle_get_router_list,
    "load_and_commit_config": handle_load_and_commit_config,
    "my_new_tool": handle_my_new_tool,    # Add your tool here
}
Step 3: Define Tool Metadata
Add the tool definition to the `list_tools()` method (around line 410):
types.Tool(
    name="my_new_tool",
    description="Brief description of what your tool does",
    inputSchema={
        "type": "object",
        "properties": {
            "router_name": {"type": "string", "description": "The name of the
            router"},
            "my_param": {"type": "string", "description": "Description of
            parameter"}
        },
        "required": ["router_name"]  # List required parameters
    }
)
Example: Creating a BGP Neighbors Tool
Here's a complete example of adding a tool to show BGP neighbors:
# Step 1: Handler function
async def handle_show_bgp_neighbors(arguments: dict) -> list[types.ContentBloc
]:
    """Handler for show_bgp_neighbors tool"""
    router_name = arguments.get("router_name", "")
    neighbor_address = arguments.get("neighbor_address", "")

    if router_name not in devices:
        result = f"Router {router_name} not found in the device mapping."
    else:
        log.debug(f"Getting BGP neighbors from router {router_name}")
        if neighbor_address:
            cmd = f"show bgp neighbor {neighbor_address}"
        else:
            cmd = "show bgp summary"
        result = _run_junos_cli_command(router_name, cmd)

    return [types.TextContent(type="text", text=result)]

# Step 2: Add to TOOL_HANDLERS
TOOL_HANDLERS = {
    # ... existing tools ...
    "show_bgp_neighbors": handle_show_bgp_neighbors,
}

# Step 3: Add to list_tools()
types.Tool(
    name="show_bgp_neighbors",
    description="Show BGP neighbor information",
    inputSchema={
        "type": "object",
        "properties": {
            "router_name": {"type": "string", "description": "The name of the
            router"},
            "neighbor_address": {"type": "string", "description": "Optional:
            specific neighbor IP"}
        },
        "required": ["router_name"]
    }
)
Best Practices for Tool Development
1. Error Handling: Always handle connection errors and invalid inputs
gracefully
2. Logging: Use the global `log` logger for debugging
3. Validation: Check if router exists before attempting operations
4. Documentation: Write clear descriptions for tools and parameters
5. Timeouts: Support configurable timeouts for long-running operations
6. Return Format: Always return `list[types.ContentBlock]` with text content
7. Context Parameter: Use the `context: Context` parameter to send progress
and log messages to the client
Using PyEZ for Advanced Operations
For operations beyond CLI commands, use PyEZ directly:
from jnpr.junos import Device
from jnpr.junos.utils.config import Config

# Example: Using PyEZ tables
async def handle_get_interfaces(arguments: dict) -> list[types.ContentBlock]:
    router_name = arguments.get("router_name", "")

    if router_name not in devices:
        result = f"Router {router_name} not found in the device mapping."
    else:
        device_info = devices[router_name]
        try:
            connect_params = prepare_connection_params(device_info, router_name)
            with Device(**connect_params) as junos_device:
                # Use PyEZ tables or other utilities
                interfaces = junos_device.rpc.get_interface_information()
                # Process interfaces...
                result = "Interface information..."
        except Exception as e:
            result = f"Error: {e}"

    return [types.TextContent(type="text", text=result)]
Testing Your Tools
1. Unit Testing: Test handler functions with mock arguments
2. Integration Testing: Test with actual Junos devices or vSRX
3. Error Cases: Test with invalid routers, network failures, etc.
Example test:
# Test the handler directly
result = await handle_my_new_tool({
    "router_name": "router-1",
    "my_param": "test"
})
print(result[0].text)
Debugging Tips
1. Enable debug logging to see detailed execution:
logging.basicConfig(level=logging.DEBUG)2. Use the stdio transport for easier debugging:
python jmcp.py -f devices.json -t stdio3. Test individual commands manually:
result = _run_junos_cli_command("router-1", "show version")
print(result)Frequently asked questions
What is junos-mcp-server?
junos-mcp-server is This is a Junos Model Context Protocol (MCP) Server project that provides a bridge between MCP-compatible clients (like Claude Desktop) and Juniper Junos network devices.
How do I install junos-mcp-server?
Open the GitHub repository and follow its README. Most MCP servers are added to your client's MCP config, then called by your agent.
Is junos-mcp-server open source?
Yes — it is hosted on GitHub at https://github.com/Juniper/junos-mcp-server and has 106 stars.
Related MCP tools
 cognee
Cognee is the open-source AI memory platform for agents. Give your AI agents persistent long-term memory across sessions with a self-hosted knowledge graph engine.
 skyvern
Automate browser based workflows with AI
 hindsight
Hindsight: Agent Memory That Learns
 watermarks-remover
A privacy-first app that strips AI watermarks from content you own.
 Qwen-Agent
Agent framework and applications built upon Qwen>=3.0, featuring Function Calling, MCP, Code Interpreter, RAG, Chrome extension, etc.
 pal-mcp-server
The power of Claude Code / GeminiCLI / CodexCLI + [Gemini / OpenAI / OpenRouter / Azure / Grok / Ollama / Custom Model / All Of The Above] working as one.
Run your own MCP server? See who uses it and what to fix.
Measure it with TrackMCP