
mcp-tts-voicevox
VOICEVOX MCP Server
Documentation
VOICEVOX TTS MCP
English | 日本語
A text-to-speech MCP server using VOICEVOX
> 🎮 **Try the Browser Demo** — Test VoicevoxClient directly in your browser
What You Can Do
- Make your AI assistant speak — Text-to-speech from MCP clients like Claude Desktop
- UI Audio Player (MCP Apps) — Play audio directly in the chat with an interactive player (ChatGPT / Claude Desktop / Claude Web etc.)
- Multi-character conversations — Switch speakers per segment in a single call
- Smooth playback — Queue management, immediate playback, prefetching, streaming
- Cross-platform — Works on Windows, macOS, Linux (including WSL)
UI Audio Player (MCP Apps)
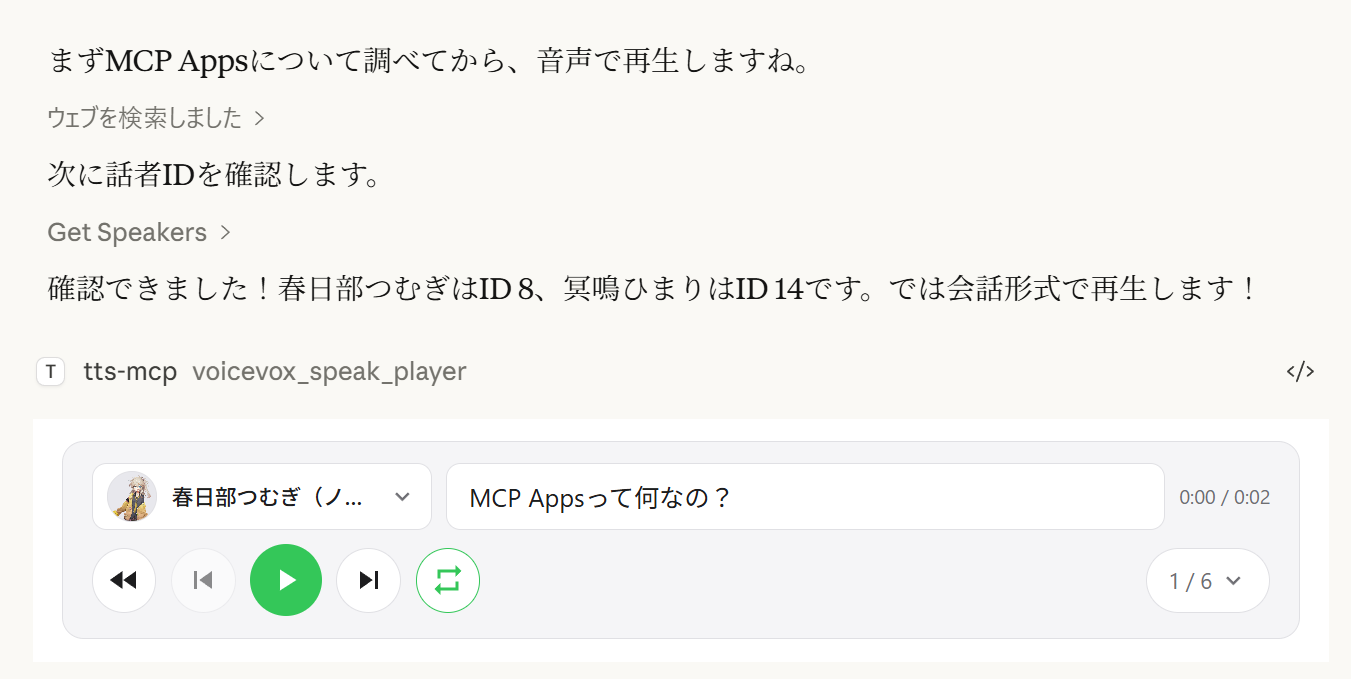
The `voicevox_speak_player` tool uses MCP Apps to render an interactive audio player directly inside the chat. Unlike the standard `voicevox_speak` tool which plays audio on the server, audio is played on the client side (in the browser/app) — no audio device needed on the server.
Features
- Client-side playback — Audio plays in Claude Desktop's chat, not on the server. Works even over remote connections.
- Play/Pause controls — Full playback controls embedded in the conversation
- Multi-speaker dialogue — Sequential playback of multiple speakers in one player with track navigation
- Speaker switching — Change the voice of any segment directly from the player UI
- Segment editing — Adjust speed, volume, intonation, pause length, and pre/post silence per segment
- Accent phrase editing — Edit accent positions and mora pitch directly in the UI
- Add / delete / reorder segments — Drag-and-drop track reordering; add new segments inline
- WAV export — Save all tracks as numbered WAV files and open the output folder automatically
- User dictionary manager — Add, edit, and delete VOICEVOX user dictionary words with preview playback
- Cross-session state restore — Player state is persisted on the server; reopening the chat restores previous tracks
Export behavior by environment:
- `Save and open` always exports WAV files. If opening the file explorer is not supported, export still succeeds and the save path is shown in the UI.
- `Choose output folder` uses a native directory picker on Windows/macOS. On unsupported environments, this action falls back to the default export directory.
| Multi-speaker playback | Track list | Segment editing |
|---|---|---|
| !Multi-speaker player | !Track list | !Segment editing |
| Speaker selection | Dictionary manager | WAV export |
|---|---|---|
| !Speaker selection | !Dictionary manager | !WAV export |
Supported Clients
| Client | Connection | Notes |
|---|---|---|
| ChatGPT | HTTP (remote) | Requires `VOICEVOX_PLAYER_DOMAIN` |
| Claude Desktop | stdio (local) | Works out of the box |
| Claude Desktop | HTTP (via mcp-remote) | Do not set `VOICEVOX_PLAYER_DOMAIN` |
> Note: `speak_player` requires a host that supports MCP Apps. In hosts without MCP Apps support, the tool is not available and `speak` (server-side playback) can be used instead.
Player MCP Tools
| Tool | Description |
|---|---|
| `voicevox_speak_player` | Create a new player session and display the UI. Returns `viewUUID`. |
| `voicevox_resynthesize_player` | Update all segments for an existing player (new `viewUUID` each call). |
| `voicevox_get_player_state` | Read the current player state (paginated) for AI tuning. |
| `voicevox_open_dictionary_ui` | Open the user dictionary manager UI. |
Quick Start
Requirements
- Node.js 20.0.0 or higher (or Bun) or Docker
- VOICEVOX Engine (must be running; included in Docker Compose)
- ffplay (optional, recommended — not needed with Docker)
Installing FFplay
ffplay is a lightweight player included with FFmpeg that supports playback from stdin. When available, it automatically enables low-latency streaming playback.
> 💡 FFplay is optional. Without it, playback falls back to temp file-based playback (Windows: PowerShell, macOS: afplay, Linux: aplay, etc.).
- Easy setup: One-liner installation for each OS (see steps below)
- Required: `ffplay` must be in PATH (restart terminal/apps after installation)
FFplay Installation and PATH Setup
Installation examples:
- Windows (any of these)
- Winget: `winget install --id=Gyan.FFmpeg -e`
- Chocolatey: `choco install ffmpeg`
- Scoop: `scoop install ffmpeg`
- Official builds: Download from https://www.gyan.dev/ffmpeg/builds/ or https://github.com/BtbN/FFmpeg-Builds and add the `bin` folder to PATH
- macOS
- Homebrew: `brew install ffmpeg`
- Linux
- Debian/Ubuntu: `sudo apt-get update && sudo apt-get install -y ffmpeg`
- Fedora: `sudo dnf install -y ffmpeg`
- Arch: `sudo pacman -S ffmpeg`
PATH Setup:
- Windows: Add `...\ffmpeg\bin` to environment variables, then restart PowerShell/terminal and editor (Claude/VS Code, etc.)
- Verify: `powershell -c "$env:Path"` should include the ffmpeg path
- macOS/Linux: Usually auto-detected. Check with `echo $PATH` if needed, restart shell.
- MCP clients (Claude Desktop/Code): Restart the app to reload PATH.
Verification:
ffplay -versionIf version info is displayed, installation is complete. CLI/MCP will automatically detect ffplay and use stdin streaming playback.
3 Steps to Get Started
1. Start VOICEVOX Engine
2. Add to Claude Desktop config file
Config file location:
- Windows: `%APPDATA%\Claude\claude_desktop_config.json`
- macOS: `~/Library/Application Support/Claude/claude_desktop_config.json`
{
  "mcpServers": {
    "tts-mcp": {
      "command": "npx",
      "args": ["-y", "@kajidog/mcp-tts-voicevox"]
    }
  }
}
> 💡 If using Bun, just replace `npx` with `bunx`:
> ```json
> "command": "bunx", "args": ["@kajidog/mcp-tts-voicevox"]
> ```
3. Restart Claude Desktop
That's it! Ask Claude to "say hello" and it will speak!
Quick Start with Docker
You can run both the MCP server and VOICEVOX Engine with a single command using Docker Compose. No Node.js or VOICEVOX installation required.
1. Start the containers
docker compose up -dThis starts the VOICEVOX Engine and the MCP server (HTTP mode on port 3000).
2. Add to Claude Desktop config file (using mcp-remote)
{
  "mcpServers": {
    "tts-mcp": {
      "command": "npx",
      "args": ["-y", "mcp-remote", "http://localhost:3000/mcp"]
    }
  }
}
3. Restart Claude Desktop
> Security (Docker): `docker-compose.yml` publishes port 3000 without authentication. `MCP_ALLOWED_HOSTS` is not a defense here — non-browser clients can send any `Host` header they like — so anyone who can reach the port can use the server. Set `MCP_API_KEY` (and send it as `X-API-Key`), or keep the port bound to a trusted network / localhost only. Consider also setting `VOICEVOX_ALLOWED_OUTPUT_DIRS` to limit where file-writing tools may write.
> Limitations (Docker): The Docker container has no audio device, so the `voicevox_speak` tool (server-side playback) is disabled by default. Use `voicevox_speak_player` instead — it plays audio on the client side (in Claude Desktop) and works without any audio device on the server. See UI Audio Player for details.
MCP Tools
`voicevox_speak` — Text-to-Speech
The main feature callable from Claude.
| Parameter | Description | Default |
|---|---|---|
| `text` | Text to speak (multiple segments separated by newlines) | Required |
| `phrases` | Inline accent notation (takes priority over `text`) | _(unset)_ |
| `speaker` | Speaker ID | 1 |
| `speedScale` | Playback speed | 1.0 |
| `immediate` | Immediate playback (clears queue) | true |
| `waitForStart` | Wait for playback to start | false |
| `waitForEnd` | Wait for playback completion | false |
> `immediate` / `waitForStart` / `waitForEnd` disappear from the tool schema when the matching `--restrict-*` option is set.
Examples:
// Simple text
{ "text": "Hello" }

// Specify speaker
{ "text": "Hello", "speaker": 3 }

// Different speakers per segment
{ "text": "1:Hello\n3:Nice weather today" }

// Wait for completion (synchronous processing)
{ "text": "Wait for this to finish before continuing", "waitForEnd": true }

// Control the accent with inline notation (`,` separates phrases, `[` marks the accent)
{ "text": "こんにちは世界", "phrases": "コン[ニ]チワ,セ[カ]イ" }
Inline Accent Notation
`phrases` (and the pronunciation field of the user dictionary tools) accepts katakana with an inline accent marker:
- `,` separates accent phrases — `コン[ニ]チワ,セ[カ]イ`
- `[` marks where the pitch drops after; `コン[ニ]チワ` means the accent falls on `ニ`
- Omitting the brackets for a phrase keeps VOICEVOX's own accent estimation for it
`text` stays required even when `phrases` is given — pass the plain text there and the notation is what gets spoken.
`voicevox_get_accent_phrases` returns the same notation for a given text, so you can read the estimated accent, tweak the bracket, and feed it back into `phrases`.
Other Tools
| Tool | Description |
|---|---|
| `voicevox_speak_player` | Speak with UI audio player (see Player MCP Tools) |
| `voicevox_ping` | Check VOICEVOX Engine connection |
| `voicevox_get_speakers` | Get list of available speakers |
| `voicevox_stop_speaker` | Stop playback and clear queue |
| `voicevox_synthesize_file` | Generate audio file |
User dictionary tools (group `dictionary`):
| Tool | Description |
|---|---|
| `voicevox_get_accent_phrases` | Get reading and accent positions of a text as inline notation |
| `voicevox_get_user_dictionary` | List user dictionary words (filter + pagination) |
| `voicevox_add_user_dictionary_word` | Add a word (pronunciation accepts inline accent notation) |
| `voicevox_update_user_dictionary_word` | Update a word (omitted fields keep their value) |
| `voicevox_delete_user_dictionary_word` | Delete a word by UUID |
| `voicevox_add_user_dictionary_words` | Add multiple words at once |
| `voicevox_update_user_dictionary_words` | Update multiple words at once |
Any tool can be turned off individually with `--disable-tools` / `VOICEVOX_DISABLED_TOOLS`, or by group with `--disable-groups` / `VOICEVOX_DISABLED_GROUPS`.
Configuration
Environment Variables
VOICEVOX Settings
| Variable | Description | Default |
|---|---|---|
| `VOICEVOX_URL` | Engine URL | `http://localhost:50021` |
| `VOICEVOX_DEFAULT_SPEAKER` | Default speaker ID | `1` |
| `VOICEVOX_DEFAULT_SPEED_SCALE` | Playback speed | `1.0` |
| `VOICEVOX_RETRY_COUNT` | Retries for failed API requests (0 disables) | `2` |
| `VOICEVOX_RETRY_DELAY_MS` | Initial retry delay in ms (exponential backoff) | `250` |
| `VOICEVOX_TIMEOUT_MS` | Timeout for a single VOICEVOX API request in ms. Raise it for long text or a slow engine | `30000` |
Playback Options
| Variable | Description | Default |
|---|---|---|
| `VOICEVOX_USE_STREAMING` | Streaming playback (requires `ffplay`) | `false` |
| `VOICEVOX_DEFAULT_POST_PHONEME_LENGTH` | Trailing silence per segment in seconds. Increase for a longer pause between queued segments (also protects the end of speech from being cut off with streaming playback) | engine default |
| `VOICEVOX_DEFAULT_IMMEDIATE` | Immediate playback | `true` |
| `VOICEVOX_DEFAULT_WAIT_FOR_START` | Wait for playback start | `false` |
| `VOICEVOX_DEFAULT_WAIT_FOR_END` | Wait for playback end | `false` |
Restriction Settings
Restrict AI from specifying certain options.
| Variable | Description |
|---|---|
| `VOICEVOX_RESTRICT_IMMEDIATE` | Restrict `immediate` option |
| `VOICEVOX_RESTRICT_WAIT_FOR_START` | Restrict `waitForStart` option |
| `VOICEVOX_RESTRICT_WAIT_FOR_END` | Restrict `waitForEnd` option |
Disable Tools
# Disable individual tools
export VOICEVOX_DISABLED_TOOLS=speak_player,synthesize_file

# Disable a built-in group of tools
export VOICEVOX_DISABLED_GROUPS=player

# Combine groups and individual tools
export VOICEVOX_DISABLED_GROUPS=dictionary
export VOICEVOX_DISABLED_TOOLS=synthesize_file
Built-in groups for `VOICEVOX_DISABLED_GROUPS` / `--disable-groups`:
| Group | Tools |
|---|---|
| `player` | `speak_player`, `resynthesize_player`, `get_player_state`, `open_dictionary_ui` |
| `dictionary` | `get_accent_phrases`, `get_user_dictionary`, `add_user_dictionary_word`, `update_user_dictionary_word`, `delete_user_dictionary_word`, `add_user_dictionary_words`, `update_user_dictionary_words` |
| `file` | `synthesize_file` |
| `apps` | `speak_player`, `resynthesize_player`, `open_dictionary_ui` (MCP App UI tools) |
UI Player Settings
| Variable | Description | Default |
|---|---|---|
| `VOICEVOX_PLAYER_DOMAIN` | Widget domain for UI player (required for ChatGPT, e.g. `https://your-app.onrender.com`) | _(unset)_ |
| `VOICEVOX_AUTO_PLAY` | Auto-play audio in UI player | `true` |
| `VOICEVOX_PLAYER_EXPORT_ENABLED` | Enable track export(download) from UI player (`false` to disable) | `true` |
| `VOICEVOX_PLAYER_EXPORT_DIR` | Default output directory for exported tracks (also used as fallback when folder picker is unavailable) | `./voicevox-player-exports` |
| `VOICEVOX_PLAYER_CACHE_DIR` | Directory for player cache files (`*.txt`) and default player state file | `./.voicevox-player-cache` |
| `VOICEVOX_PLAYER_AUDIO_CACHE_ENABLED` | Enable persistent audio cache on disk (`false` disables disk cache writes/reads) | `true` |
| `VOICEVOX_PLAYER_AUDIO_CACHE_TTL_DAYS` | Audio cache retention in days (`0`: disable disk cache, `-1`: no TTL cleanup) | `30` |
| `VOICEVOX_PLAYER_AUDIO_CACHE_MAX_MB` | Audio cache size cap in MB (`0`: disable disk cache, `-1`: unlimited) | `512` |
| `VOICEVOX_PLAYER_STATE_FILE` | Path of persisted player state JSON | `/player-state.json` |
File Output Settings
| Variable | Description | Default |
|---|---|---|
| `VOICEVOX_ALLOWED_OUTPUT_DIRS` | Comma-separated directories that file-writing tools (`voicevox_synthesize_file`, player track export) may write into. Paths outside them are rejected with an error. Unset means no restriction — recommended to set when the server is exposed over HTTP | _(unset)_ |
Server Settings
| Variable | Description | Default |
|---|---|---|
| `MCP_HTTP_MODE` | Enable HTTP mode | `false` |
| `MCP_HTTP_PORT` | HTTP port | `3000` |
| `MCP_HTTP_HOST` | HTTP host | `0.0.0.0` |
| `MCP_ALLOWED_HOSTS` | Allowed hosts (comma-separated) | `localhost,127.0.0.1,[::1]` |
| `MCP_ALLOWED_ORIGINS` | Allowed origins (comma-separated) | `http://localhost,http://127.0.0.1,...` |
| `MCP_API_KEY` | Required API key for `/mcp` (sent via `X-API-Key` or `Authorization: Bearer`) | _(unset)_ |
Command Line Arguments
Command line arguments take priority over environment variables.
The complete, up-to-date list of options is always available via `npx @kajidog/mcp-tts-voicevox --help`.
# Basic settings
npx @kajidog/mcp-tts-voicevox --url http://192.168.1.100:50021 --speaker 3 --speed 1.2

# HTTP mode
npx @kajidog/mcp-tts-voicevox --http --port 8080

# With restrictions
npx @kajidog/mcp-tts-voicevox --restrict-immediate --restrict-wait-for-end

# Disable individual tools
npx @kajidog/mcp-tts-voicevox --disable-tools speak_player,synthesize_file

# Disable a tool group
npx @kajidog/mcp-tts-voicevox --disable-groups player| Argument | Description |
|---|---|
| `--help`, `-h` | Show help |
| `--version`, `-v` | Show version |
| `--init` | Generate `.voicevoxrc.json` with default settings |
| `--config ` | Path to config file |
| `--url ` | VOICEVOX Engine URL |
| `--speaker ` | Default speaker ID |
| `--speed ` | Playback speed |
| `--use-streaming` / `--no-use-streaming` | Streaming playback |
| `--post-phoneme-length ` | Trailing silence per segment (pause between queued segments) |
| `--immediate` / `--no-immediate` | Immediate playback |
| `--wait-for-start` / `--no-wait-for-start` | Wait for start |
| `--wait-for-end` / `--no-wait-for-end` | Wait for end |
| `--restrict-immediate` | Restrict immediate |
| `--restrict-wait-for-start` | Restrict waitForStart |
| `--restrict-wait-for-end` | Restrict waitForEnd |
| `--allowed-output-dirs ` | Directories that file-writing tools may write into (comma-separated; unset = no restriction) |
| `--disable-tools ` | Disable tools (comma-separated tool names) |
| `--disable-groups ` | Disable tool groups: `player`, `dictionary`, `file`, `apps` |
| `--auto-play` / `--no-auto-play` | Auto-play in UI player |
| `--player-export` / `--no-player-export` | Enable/disable track export(download) in UI player |
| `--player-export-dir ` | Default output directory for exported tracks |
| `--player-cache-dir ` | Player cache directory |
| `--player-state-file ` | Persisted player state file path |
| `--player-audio-cache` / `--no-player-audio-cache` | Enable/disable disk audio cache for player |
| `--player-audio-cache-ttl-days ` | Audio cache retention days (`0`: disable, `-1`: no TTL cleanup) |
| `--player-audio-cache-max-mb ` | Audio cache size cap in MB (`0`: disable, `-1`: unlimited) |
| `--http` | HTTP mode |
| `--port ` | HTTP port |
| `--host ` | HTTP host |
| `--allowed-hosts ` | Allowed hosts (comma-separated) |
| `--allowed-origins ` | Allowed origins (comma-separated) |
| `--api-key ` | Required API key for `/mcp` |
Config File (.voicevoxrc.json)
You can use a JSON config file instead of (or in addition to) environment variables and CLI arguments. This is useful when you have many settings to configure.
Priority order: CLI args > Environment variables > Config file > Defaults
Generate a config file
npx @kajidog/mcp-tts-voicevox --initThis creates `.voicevoxrc.json` in the current directory with all default settings. Edit it as needed.
Use a custom config file path
npx @kajidog/mcp-tts-voicevox --config ./my-config.jsonOr via environment variable:
VOICEVOX_CONFIG=./my-config.json npx @kajidog/mcp-tts-voicevoxExample `.voicevoxrc.json`
{
  "url": "http://192.168.1.50:50021",
  "speaker": 3,
  "speed": 1.2,
  "http": true,
  "port": 8080,
  "disable-tools": ["synthesize_file"],
  "disable-groups": ["dictionary"]
}
Keys can be written in kebab-case (`use-streaming`), camelCase (`useStreaming`), or internal key names (`defaultSpeaker`). If `.voicevoxrc.json` exists in the current directory, it is loaded automatically.
HTTP Mode
For remote connections:
Start Server:
# Linux/macOS
MCP_HTTP_MODE=true MCP_HTTP_PORT=3000 npx @kajidog/mcp-tts-voicevox

# Windows PowerShell
$env:MCP_HTTP_MODE='true'; $env:MCP_HTTP_PORT='3000'; npx @kajidog/mcp-tts-voicevox
Claude Desktop Config (using mcp-remote):
{
  "mcpServers": {
    "tts-mcp-proxy": {
      "command": "npx",
      "args": ["-y", "mcp-remote", "http://localhost:3000/mcp"]
    }
  }
}
Per-Project Speaker Settings
With Claude Code, you can configure different default speakers per project using custom headers in `.mcp.json`:
| Header | Description |
|---|---|
| `X-Voicevox-Speaker` | Default speaker ID for this project |
| `X-API-Key` | API key when `MCP_API_KEY` is configured |
Example `.mcp.json`:
{
  "mcpServers": {
    "tts": {
      "type": "http",
      "url": "http://localhost:3000/mcp",
      "headers": {
        "X-Voicevox-Speaker": "113",
        "X-API-Key": "your-api-key"
      }
    }
  }
}
This allows each project to use a different voice character automatically.
Priority order:
1. Explicit `speaker` parameter in tool call (highest)
2. Project default from `X-Voicevox-Speaker` header
3. Global `VOICEVOX_DEFAULT_SPEAKER` setting (lowest)
WSL to Windows Host Connection
Connecting from WSL to an MCP server running on Windows:
1. Get Windows Host IP from WSL
# Method 1: From default gateway
ip route show | grep -oP 'default via \K[\d.]+'
# Usually in the format 172.x.x.1

# Method 2: From /etc/resolv.conf (WSL2)
cat /etc/resolv.conf | grep nameserver | awk '{print $2}'
2. Start Server on Windows
Add the WSL gateway IP to `MCP_ALLOWED_HOSTS` to allow access from WSL:
$env:MCP_HTTP_MODE='true'
$env:MCP_ALLOWED_HOSTS='localhost,127.0.0.1,172.29.176.1'
npx @kajidog/mcp-tts-voicevox
Or with CLI arguments:
npx @kajidog/mcp-tts-voicevox --http --allowed-hosts "localhost,127.0.0.1,172.29.176.1"3. WSL Configuration (.mcp.json)
{
  "mcpServers": {
    "tts": {
      "type": "http",
      "url": "http://172.29.176.1:3000/mcp"
    }
  }
}
> ⚠️ Within WSL, `localhost` refers to WSL itself. Use the WSL gateway IP to access the Windows host.
Using with ChatGPT
To use with ChatGPT, deploy the MCP server in HTTP mode to the cloud with access to a VOICEVOX Engine.
1. Deploy to the Cloud
Deploy with Docker to Render, Railway, etc. (Dockerfile included).
2. Set Up VOICEVOX Engine
Run VOICEVOX Engine locally and expose it via ngrok, or deploy it alongside the MCP server.
3. Configure Environment Variables
| Variable | Example | Description |
|---|---|---|
| `VOICEVOX_URL` | `https://xxxx.ngrok-free.app` | VOICEVOX Engine URL |
| `MCP_HTTP_MODE` | `true` | Enable HTTP mode |
| `MCP_ALLOWED_HOSTS` | `your-app.onrender.com` | Deployed hostname |
| `VOICEVOX_PLAYER_DOMAIN` | `https://your-app.onrender.com` | Widget domain for UI player (required for ChatGPT) |
| `VOICEVOX_DISABLED_TOOLS` | `speak` | Disable server-side playback (no audio device) |
| `VOICEVOX_PLAYER_EXPORT_ENABLED` | `false` | Disable export feature (files cannot be downloaded from cloud) |
4. Add Connector in ChatGPT
Go to ChatGPT Settings → Connectors → Add MCP server URL (`https://your-app.onrender.com/mcp`).
Using with Claude Web
The basic steps are the same as ChatGPT, but the `VOICEVOX_PLAYER_DOMAIN` value is different.
Claude Web requires `ui.domain` to be a hash-based dedicated domain. Compute it with the following command:
node -e "console.log(require('crypto').createHash('sha256').update('Your MCP server URL').digest('hex').slice(0,32)+'.claudemcpcontent.com')"Example: If your MCP server URL is `https://your-app.onrender.com/mcp`:
node -e "console.log(require('crypto').createHash('sha256').update('https://your-app.onrender.com/mcp').digest('hex').slice(0,32)+'.claudemcpcontent.com')"
# Example output: 48fb73a6...claudemcpcontent.com
Set this output value as `VOICEVOX_PLAYER_DOMAIN`.
> Note: Since ChatGPT and Claude Web require different `VOICEVOX_PLAYER_DOMAIN` values, a single instance cannot serve both clients simultaneously. Deploy separate instances for each, or switch the environment variable depending on your target client.
Troubleshooting
Audio is not playing
1. Check if VOICEVOX Engine is running
curl http://localhost:50021/speakers2. Check platform-specific playback tools
| OS | Required Tool |
|---|---|
| Linux | One of `aplay`, `paplay`, `play`, `ffplay` |
| macOS | `afplay` (pre-installed) |
| Windows | PowerShell (pre-installed) |
Not recognized by MCP client
- Check package installation: `npm list -g @kajidog/mcp-tts-voicevox`
- Verify JSON syntax in config file
- Restart the client
Package Structure
| Package | Description |
|---|---|
| `@kajidog/mcp-tts-voicevox` | MCP server (`apps/mcp-tts`) |
| `@kajidog/voicevox-client` | General-purpose VOICEVOX client library (can be used independently) |
| `@kajidog/mcp-core` | Shared MCP infrastructure (config schema, HTTP/stdio launcher). Not published — bundled into the server |
| `@kajidog/player-ui` | React-based audio player UI, bundled into a single HTML file. Not published |
Developer Information
Setup
git clone https://github.com/kajidog/mcp-tts-voicevox.git
cd mcp-tts-voicevox
pnpm install
Commands
The package manager is pnpm (npm / yarn are not supported).
| Command | Description |
|---|---|
| `pnpm build` | Build all packages |
| `pnpm test` | Run tests |
| `pnpm lint` | Run lint (single Biome pass over the whole workspace) |
| `pnpm typecheck` | Type-check every package |
| `pnpm changeset` | Add a changeset for a user-facing change |
Dev servers live in the server package, so run them with a filter:
| Command | Description |
|---|---|
| `pnpm --filter @kajidog/mcp-tts-voicevox dev` | Start dev server (stdio) |
| `pnpm --filter @kajidog/mcp-tts-voicevox dev:http` | Start dev server in HTTP mode |
| `pnpm --filter @kajidog/mcp-tts-voicevox dev:bun` | Start dev server with Bun |
| `pnpm --filter @kajidog/mcp-tts-voicevox dev:bun:http` | Start HTTP dev server with Bun |
License
ISC
Frequently asked questions
What is mcp-tts-voicevox?
mcp-tts-voicevox is VOICEVOX MCP Server
How do I install mcp-tts-voicevox?
Open the GitHub repository and follow its README. Most MCP servers are added to your client's MCP config, then called by your agent.
Is mcp-tts-voicevox open source?
Yes — it is hosted on GitHub at https://github.com/kajidog/mcp-tts-voicevox and has 9 stars.
Related MCP tools
 unla
unla🧩 MCP Gateway - A lightweight gateway service that instantly transforms existing MCP Servers and APIs into MCP servers with zero code changes.
 metamcp
MCP Aggregator, Orchestrator, Middleware, Gateway in one docker TypeScript-based implementation. Trusted by 1400+ developers.
 n8n-mcp
A MCP for Claude Desktop / Claude Code / Windsurf / Cursor to build n8n workflows for you
 playwright-mcp
Playwright MCP server TypeScript-based implementation. Trusted by 22000+ developers. Trusted by 22000+ developers. Trusted by 22000+ developers.
 activepieces
AI Agents & MCPs & AI Workflow Automation • (~400 MCP servers for AI agents) • AI Automation / AI Agent with MCPs • AI Workflows & AI Agents • MCPs for AI Ag...
 mcp-server-chart
🤖 A visualization mcp contains 25+ visual charts using @antvis. Using for chart generation and data analysis. TypeScript-based implementation.
Run your own MCP server? See who uses it and what to fix.
Measure it with TrackMCP