
mcp-odbc-server
Typescript based Model Context Procotol (MCP) Server for Open Database Connectivity (ODBC)
Documentation
OpenLink MCP Server for ODBC
This document covers the set up and use of a generic ODBC server for the Model Context Protocol (MCP), referred to as an `mcp-odbc` server. It has been developed to provide Large Language Models with transparent access to ODBC-accessible data sources via a Data Source Name configured for a specific ODBC Connector (also called an ODBC Driver).
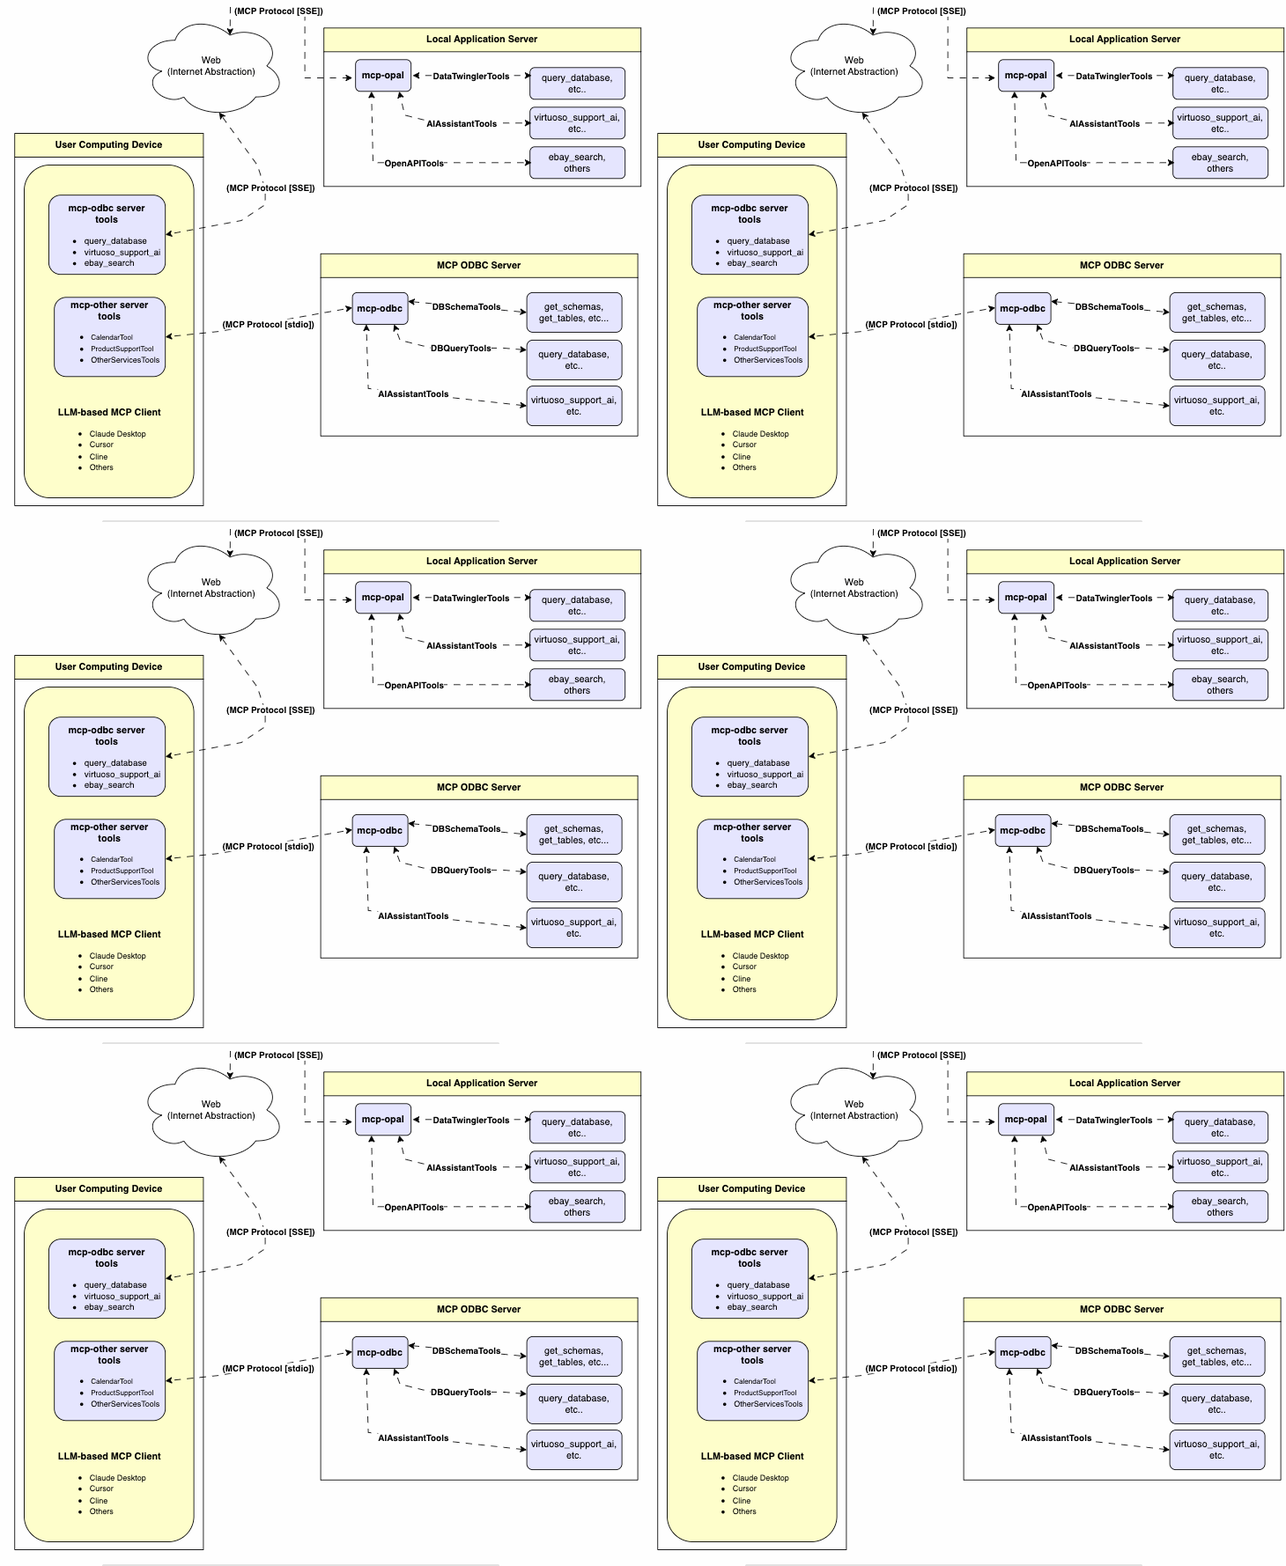
Server Implementation
This MCP Server for ODBC is a small TypeScript layer built on top of `node-odbc`. It routes calls to the host system's local ODBC Driver Manager via `node.js` (specifically using `npx` for TypeScript).
Operating Environment Set Up & Prerequisites
While the examples that follow are oriented toward the Virtuoso ODBC Connector, this guide will also work with other ODBC Connectors. We *strongly* encourage code contributions and submissions of usage demos related to other database management systems (DBMS) for incorporation into this project.
Key System Components
1. Check the `node.js` version. If it's not `21.1.0` or higher, upgrade or install explicitly using:
nvm install v21.1.02. Install MCP components using:
npm install @modelcontextprotocol/sdk zod tsx odbc dotenv3. Set the `nvm` version using:
nvm alias default 21.1.0Installation
1. Run
git clone https://github.com/OpenLinkSoftware/mcp-odbc-server.git2. Change directory
cd mcp-odbc-server3. Run
npm init -y4. Run
npm install @modelcontextprotocol/sdk zod tsx odbc dotenvunixODBC Runtime Environment Checks
1. Check installation configuration (i.e., location of key INI files) by running:
odbcinst -j2. List available data source names (DSNs) by running:
odbcinst -q -sEnvironment Variables
As good security practice, you should use the `.env` file situated in the same directory as the `mcp-ser` to set bindings for the ODBC Data Source Name (`ODBC_DSN`), the User (`ODBC_USER`), the Password (`ODBC_PWD`), the ODBC INI (`ODBCINI`), and, if you want to use the OpenLink AI Layer (OPAL) via ODBC, the target Large Language Model (LLM) API Key (`API_KEY`).
API_KEY=sk-xxx
ODBC_DSN=Local Virtuoso
ODBC_USER=dba
ODBC_PASSWORD=dba
ODBCINI=/Library/ODBC/odbc.ini
Usage
Tools
After successful installation, the following tools will be available to MCP client applications.
Overview
| name | description |
|---|---|
| `get_schemas` | List database schemas accessible to connected database management system (DBMS). |
| `get_tables` | List tables associated with a selected database schema. |
| `describe_table` | Provide the description of a table associated with a designated database schema. This includes information about column names, data types, null handling, autoincrement, primary key, and foreign keys |
| `filter_table_names` | List tables associated with a selected database schema, based on a substring pattern from the `q` input field. |
| `query_database` | Execute a SQL query and return results in JSON Lines (JSONL) format. |
| `execute_query` | Execute a SQL query and return results in JSON Lines (JSONL) format. |
| `execute_query_md` | Execute a SQL query and return results in Markdown table format. |
| `spasql_query` | Execute a SPASQL query and return results. |
| `sparql_query` | Execute a SPARQL query and return results. |
| `virtuoso_support_ai` | Interact with the Virtuoso Support Assistant/Agent — a Virtuoso-specific feature for interacting with LLMs |
Detailed Description
- `get_schemas`
- Retrieve and return a list of all schema names from the connected database.
- Input parameters:
- `user` (string, optional): Database username. Defaults to `"demo"`.
- `password` (string, optional): Database password. Defaults to `"demo"`.
- `dsn` (string, optional): ODBC data source name. Defaults to `"Local Virtuoso"`.
- Returns a JSON string array of schema names.
- `get_tables`
- Retrieve and return a list containing information about tables in a specified schema. If no schema is provided, uses the connection's default schema.
- Input parameters:
- `schema` (string, optional): Database schema to filter tables. Defaults to connection default.
- `user` (string, optional): Database username. Defaults to `"demo"`.
- `password` (string, optional): Database password. Defaults to `"demo"`.
- `dsn` (string, optional): ODBC data source name. Defaults to `"Local Virtuoso"`.
- Returns a JSON string containing table information (e.g., `TABLE_CAT`, `TABLE_SCHEM`, `TABLE_NAME`, `TABLE_TYPE`).
- `filter_table_names`
- Filters and returns information about tables whose names contain a specific substring.
- Input parameters:
- `q` (string, required): The substring to search for within table names.
- `schema` (string, optional): Database schema to filter tables. Defaults to connection default.
- `user` (string, optional): Database username. Defaults to `"demo"`.
- `password` (string, optional): Database password. Defaults to `"demo"`.
- `dsn` (string, optional): ODBC data source name. Defaults to `"Local Virtuoso"`.
- Returns a JSON string containing information for matching tables.
- `describe_table`
- Retrieve and return detailed information about the columns of a specific table.
- Input parameters:
- `schema` (string, required): The database schema name containing the table.
- `table` (string, required): The name of the table to describe.
- `user` (string, optional): Database username. Defaults to `"demo"`.
- `password` (string, optional): Database password. Defaults to `"demo"`.
- `dsn` (string, optional): ODBC data source name. Defaults to `"Local Virtuoso"`.
- Returns a JSON string describing the table's columns (e.g., `COLUMN_NAME`, `TYPE_NAME`, `COLUMN_SIZE`, `IS_NULLABLE`).
- `query_database`
- Execute a standard SQL query and return the results in JSON format.
- Input parameters:
- `query` (string, required): The SQL query string to execute.
- `user` (string, optional): Database username. Defaults to `"demo"`.
- `password` (string, optional): Database password. Defaults to `"demo"`.
- `dsn` (string, optional): ODBC data source name. Defaults to `"Local Virtuoso"`.
- Returns query results as a JSON string.
- `query_database_md`
- Execute a standard SQL query and return the results formatted as a Markdown table.
- Input parameters:
- `query` (string, required): The SQL query string to execute.
- `user` (string, optional): Database username. Defaults to `"demo"`.
- `password` (string, optional): Database password. Defaults to `"demo"`.
- `dsn` (string, optional): ODBC data source name. Defaults to `"Local Virtuoso"`.
- Returns query results as a Markdown table string.
- `query_database_jsonl`
- Execute a standard SQL query and return the results in JSON Lines (JSONL) format (one JSON object per line).
- Input parameters:
- `query` (string, required): The SQL query string to execute.
- `user` (string, optional): Database username. Defaults to `"demo"`.
- `password` (string, optional): Database password. Defaults to `"demo"`.
- `dsn` (string, optional): ODBC data source name. Defaults to `"Local Virtuoso"`.
- Returns query results as a JSONL string.
- `spasql_query`
- Execute a SPASQL (SQL/SPARQL hybrid) query return results. This is a Virtuoso-specific feature.
- Input parameters:
- `query` (string, required): The SPASQL query string.
- `max_rows` (number, optional): Maximum number of rows to return. Defaults to `20`.
- `timeout` (number, optional): Query timeout in milliseconds. Defaults to `30000`, i.e., 30 seconds.
- `user` (string, optional): Database username. Defaults to `"demo"`.
- `password` (string, optional): Database password. Defaults to `"demo"`.
- `dsn` (string, optional): ODBC data source name. Defaults to `"Local Virtuoso"`.
- Returns the result from the underlying stored procedure call (e.g., `Demo.demo.execute_spasql_query`).
- `sparql_query`
- Execute a SPARQL query and return results. This is a Virtuoso-specific feature.
- Input parameters:
- `query` (string, required): The SPARQL query string.
- `format` (string, optional): Desired result format. Defaults to `'json'`.
- `timeout` (number, optional): Query timeout in milliseconds. Defaults to `30000`, i.e., 30 seconds.
- `user` (string, optional): Database username. Defaults to `"demo"`.
- `password` (string, optional): Database password. Defaults to `"demo"`.
- `dsn` (string, optional): ODBC data source name. Defaults to `"Local Virtuoso"`.
- Returns the result from the underlying function call (e.g., `"UB".dba."sparqlQuery"`).
- `virtuoso_support_ai`
- Utilizes a Virtuoso-specific AI Assistant function, passing a prompt and optional API key. This is a Virtuoso-specific feature.
- Input parameters:
- `prompt` (string, required): The prompt text for the AI function.
- `api_key` (string, optional): API key for the AI service. Defaults to `"none"`.
- `user` (string, optional): Database username. Defaults to `"demo"`.
- `password` (string, optional): Database password. Defaults to `"demo"`.
- `dsn` (string, optional): ODBC data source name. Defaults to `"Local Virtuoso"`.
- Returns the result from the AI Support Assistant function call (e.g., `DEMO.DBA.OAI_VIRTUOSO_SUPPORT_AI`).
Basic Installation Testing & Troubleshooting
MCP Inspector Tool
Canonical MCP Inspector Tool Edition
1. Start the inspector from the mcp-server directory/folder using the following command:
ODBCINI=/Library/ODBC/odbc.ini npx -y @modelcontextprotocol/inspector npx tsx ./src/main.ts2. Click on the "Connect" button, then click on the "Tools" tab to get started.
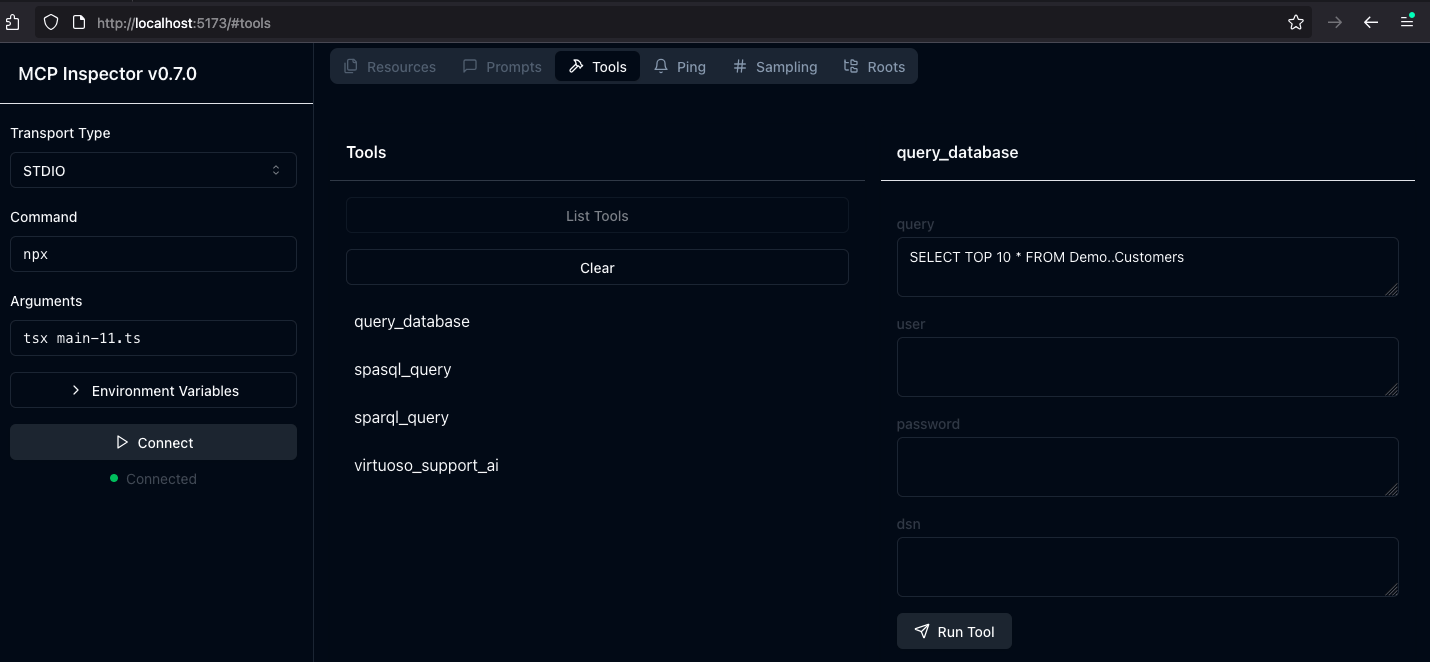
OpenLink MCP Inspector Tool Edition
This is a fork of the canonical edition that includes a JSON handling bug fix related to use with this MCP Server.
1. run
git clone git@github.com:OpenLinkSoftware/inspector.git
   cd inspector
2. run
npm run start3. Provide the following value in the `Arguments` input field of MCP Inspectors UI from http://localhost:6274
tsx /path/to/mcp-odbc-server/src/main.ts4. Click on the `Connect` button to initialize your session with the designated MCP Server
Apple Silicon (ARM64) Compatibility with MCP ODBC Server Issues
Node x86_64 vs arm64 Conflict Issue
The x86_64 rather than arm64 edition of `node` may be in place, but the ODBC bridge and MCP server are arm64-based components.
You can solve this problem by performing the following steps:
1. Uninstall the x86_64 edition of `node` by running:
nvm uninstall 21.1.02. Run the following command to confirm your current shell is in arm64 mode:
archarch arm643. Install the arm64 edition of `node` by running:
nvm install 21.1.0Node to ODBC Bridge Layer Incompatibility
When attempting to use a Model Context Protocol (MCP) ODBC Server on Apple Silicon machines, you may encounter architecture mismatch errors. These occur because the `Node.js` ODBC native module (`odbc.node`) is compiled for ARM64 architecture, but the x86_64-based edition of the unixODBC runtime is being loaded.
Typical error message:
Error: dlopen(...odbc.node, 0x0001): tried: '...odbc.node' (mach-o file, but is an incompatible architecture (have 'x86_64', need 'arm64e' or 'arm64'))You solve this problem by performing the following steps:
1. Verify your `Node.js` is running in ARM64 mode:
node -p "process.arch" # Should output: `arm64`2. Install unixODBC for ARM64:
# Verify Homebrew is running in ARM64 mode
   which brew  # Should point to /opt/homebrew/bin/brew

   # Remove existing unixODBC
   brew uninstall --force unixodbc

   # Install ARM64 version
   arch -arm64 brew install unixodbc
3. Rebuild the Node.js ODBC module for ARM64:
# Navigate to your project
   cd /path/to/mcp-odbc-server

   # Remove existing module
   rm -rf node_modules/odbc

   # Set architecture environment variable
   export npm_config_arch=arm64

   # Reinstall with force build
   npm install odbc --build-from-source
4. Verify the module is now ARM64:
file node_modules/odbc/lib/bindings/napi-v8/odbc.node
   # Should show "arm64" instead of "x86_64"
Key Points
- Both unixODBC and the `Node.js` ODBC module must be ARM64-compatible
- Using environment variables (`export npm_config_arch=arm64`) is more reliable than `npm config` commands
- Always verify architecture with the `file` command or `node -p "process.arch"`
- When using Homebrew on Apple Silicon, commands can be prefixed with `arch -arm64` to force use of ARM64 binaries
MCP Application Usage
Claude Desktop Configuration
The path for this config file is: `~{username}/Library/Application Support/Claude/claude_desktop_config.json`.
{
    "mcpServers": {
        "ODBC": {
            "command": "/path/to/.nvm/versions/node/v21.1.0/bin/node",
            "args": [
                "/path/to/mcp-odbc-server/node_modules/.bin/tsx",
                "/path/to/mcp-odbc-server/src/main.ts"
            ],
            "env": {
                "ODBCINI": "/Library/ODBC/odbc.ini",
                "NODE_VERSION": "v21.1.0",
                "PATH": "~/.nvm/versions/node/v21.1.0/bin:${PATH}"
            },
            "disabled": false,
            "autoApprove": []
        }
    }
}
Claude Desktop Usage
1. Start the application.
2. Apply configuration (from above) via Settings | Developer user interface.
3. Ensure you have a working ODBC connection to a Data Source Name (DSN).
4. Present a prompt requesting query execution, e.g.,
Execute the following query: SELECT TOP * from Demo..Customers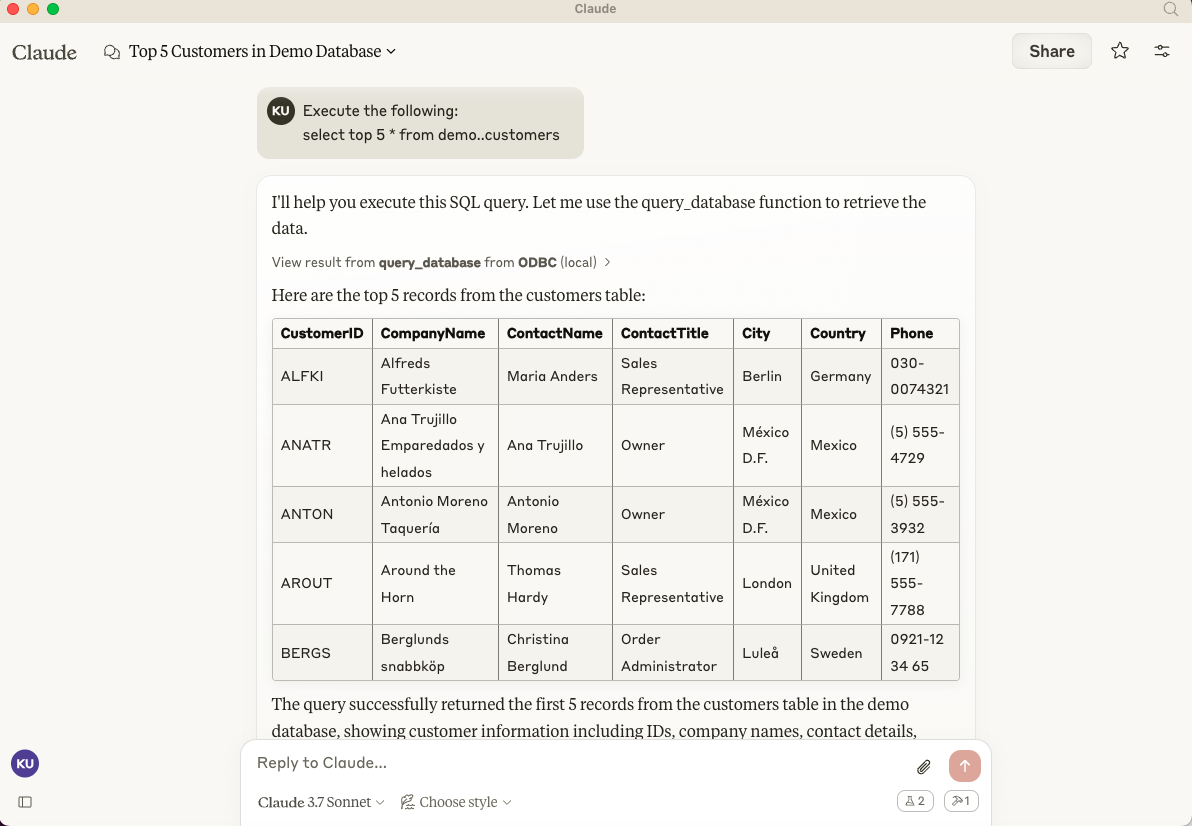
Cline (Visual Studio Extension) Configuration
The path for this config file is: `~{username}/Library/Application\ Support/Code/User/globalStorage/saoudrizwan.claude-dev/settings/cline_mcp_settings.json`
{
  "mcpServers": {
    "ODBC": {
      "command": "/path/to/.nvm/versions/node/v21.1.0/bin/node",
      "args": [
        "/path/to/mcp-odbc-server/node_modules/.bin/tsx",
        "/path/to/mcp-odbc-server/src/main.ts"
      ],
      "env": {
        "ODBCINI": "/Library/ODBC/odbc.ini",
        "NODE_VERSION": "v21.1.0",
        "PATH": "/path/to/.nvm/versions/node/v21.1.0/bin:${PATH}"
      },
      "disabled": false,
      "autoApprove": []
    }
  }
}
Cline (Visual Studio Extension) Usage
1. Use Shift+Command+`P` to open the Command Palette.
2. Type in: `Cline`.
3. Select: `Cline View`, which opens the Cline UI in the VSCode sidebar.
4. Use the four-squares icon to access the UI for installing and configuring MCP servers.
6. Apply the Cline Config (from above).
7. Return to the extension's main UI and start a new task requesting processing of the following prompt:
"Execute the following query: SELECT TOP 5 * from Demo..Customers"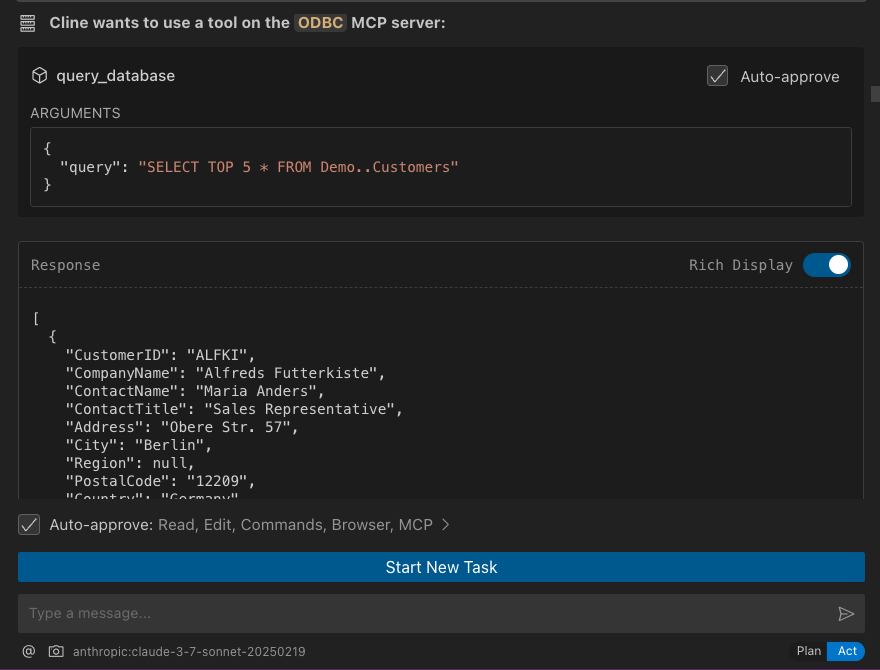
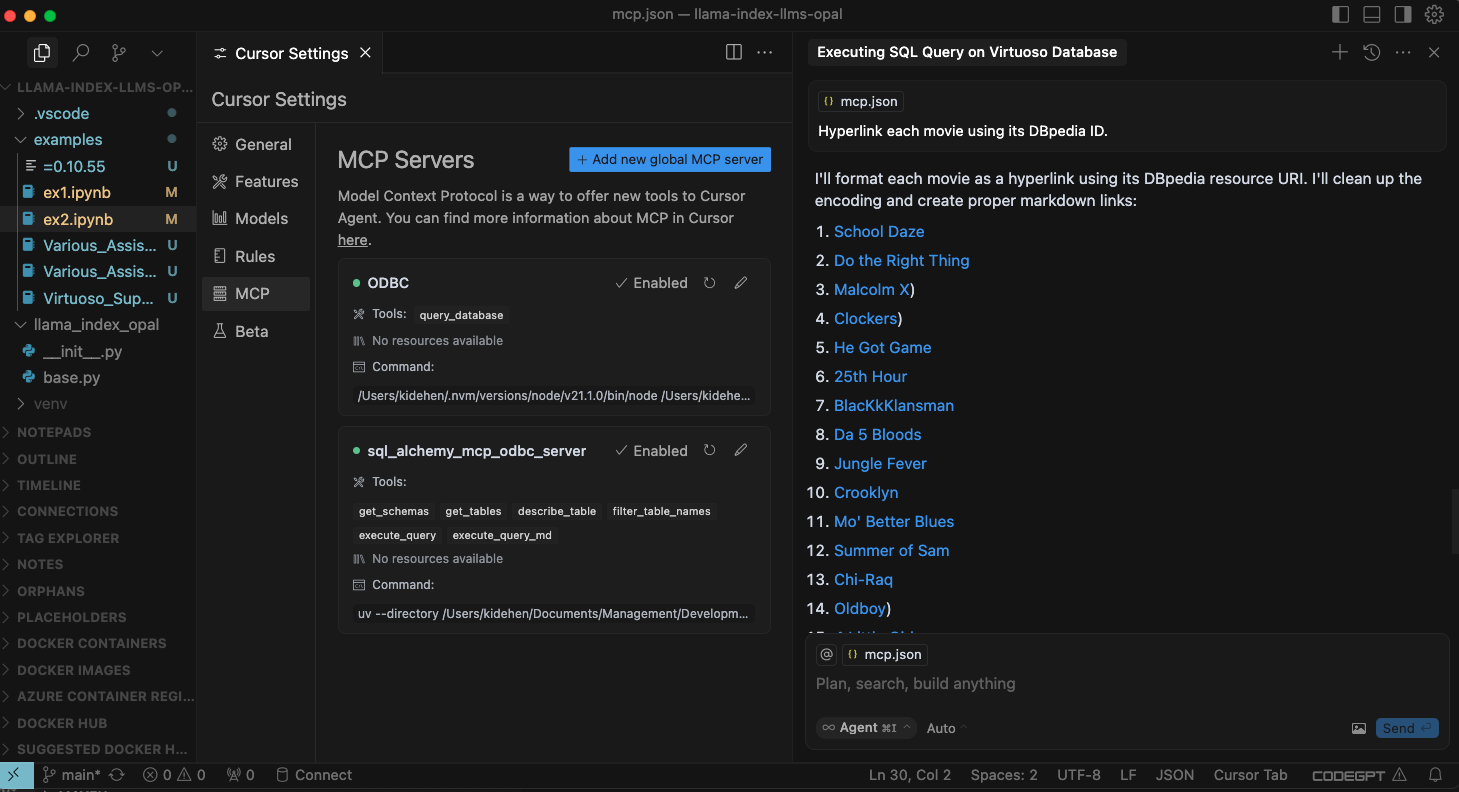
Cursor Configuration
Use the settings gear to open the configuration menu that includes the MCP menu item for registering and configuring `mcp servers`.
Cursor Usage
1. Use the Command+`I` or Control+`I` key combination to open the Chat Interface.
2. Select `Agent` from the drop-down at the bottom left of the UI, where the default is `Ask`.
3. Enter your prompt, qualifying the use of the `mcp-server for odbc` using the pattern: `@odbc {rest-of-prompt}`.
4. Click on "Accept" to execute the prompt.
Related
Frequently asked questions
What is mcp-odbc-server?
mcp-odbc-server is Typescript based Model Context Procotol (MCP) Server for Open Database Connectivity (ODBC)
How do I install mcp-odbc-server?
Open the GitHub repository and follow its README. Most MCP servers are added to your client's MCP config, then called by your agent.
Is mcp-odbc-server open source?
Yes — it is hosted on GitHub at https://github.com/OpenLinkSoftware/mcp-odbc-server and has 9 stars.
Related MCP tools
 playwright-mcp
Playwright MCP server TypeScript-based implementation. Trusted by 22000+ developers. Trusted by 22000+ developers. Trusted by 22000+ developers.
 notion-mcp-server
Official Notion MCP Server TypeScript-based implementation. Trusted by 3400+ developers. Trusted by 3400+ developers. Trusted by 3400+ developers.
 mcpso
mcpsoDirectory for Awesome MCP Servers TypeScript-based implementation. Trusted by 1900+ developers. Trusted by 1900+ developers.
 unla
unla🧩 MCP Gateway - A lightweight gateway service that instantly transforms existing MCP Servers and APIs into MCP servers with zero code changes.
 metamcp
MCP Aggregator, Orchestrator, Middleware, Gateway in one docker TypeScript-based implementation. Trusted by 1400+ developers.
 mcp-server-kubernetes
MCP Server for kubernetes management commands TypeScript-based implementation. Trusted by 1100+ developers. Trusted by 1100+ developers.
Run your own MCP server? See who uses it and what to fix.
Measure it with TrackMCP