
UnityCodeMCPServer
Unity Code MCP Server is a powerful tool for the Unity Editor that gives AI Agents ability to perform any action using Unity Editor API. This includes scripts, scenes, prefabs, assets, configuration changes, and more.
Documentation
Unity Code MCP Server
Search the live Unity project
Inspect active scenes, components, assets, console output, settings, Play Mode state, and runtime values from an MCP client.
Execute directly inside the Editor
Create and modify GameObjects, prefabs, ScriptableObjects, import settings, and other Unity assets by executing C# in the Editor.
Verify with runtime feedback
Run Edit Mode and Play Mode tests, enter Play Mode, simulate player input, capture screenshots, read Unity console logs, and inspect live game state after actions.
*Example agent workflow: Play Pong in a closed loop by using `enter_play_mode`, `execute_csharp_script_in_unity_editor`, `play_unity_game`, and `read_unity_console_logs` to search runtime state, execute input actions, verify the result, and adapt the next move.*
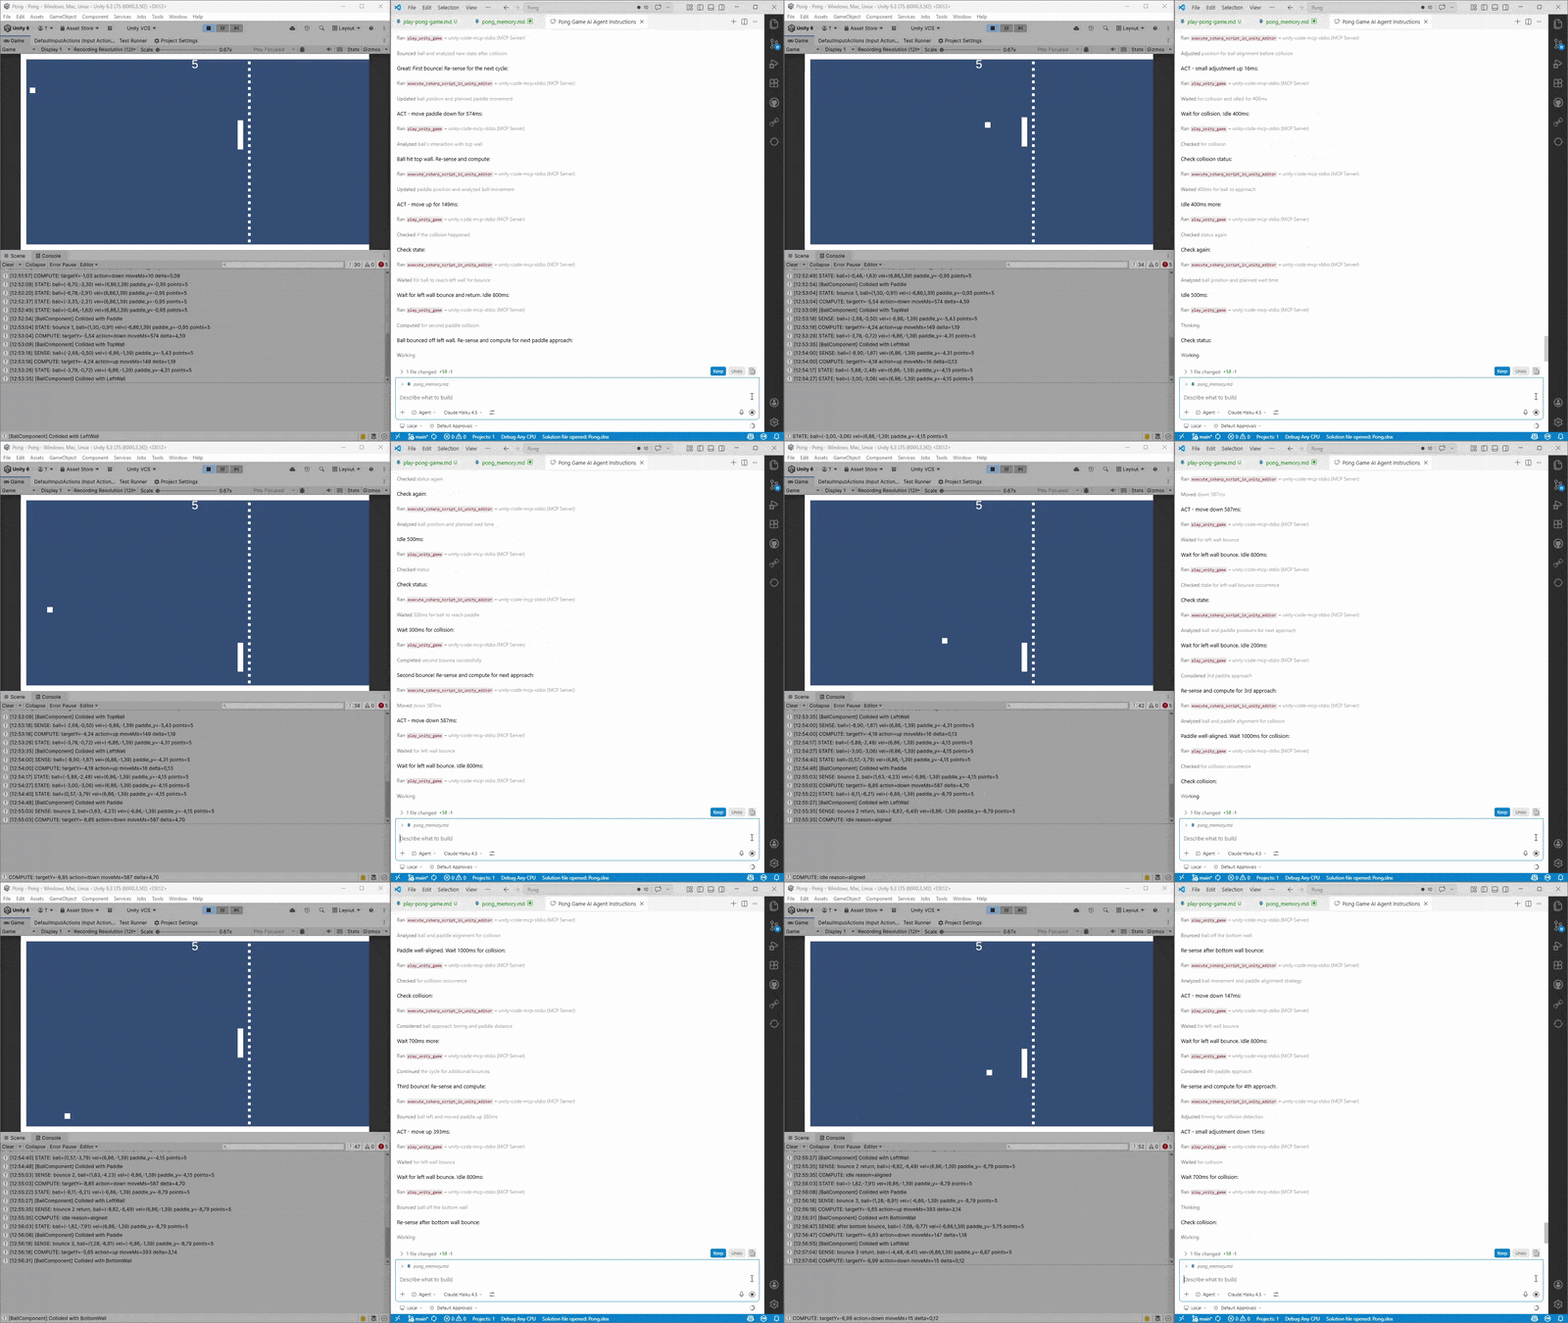
Real workflow example
See the full cities workflow example and transcript.
Table of contents
- Tools
- Security considerations
- Architecture
- Quick start
- Built-in tools
- Agent skills
- Extending (adding tools)
- Script execution context
- STDIO bridge
- Testing
- Known Issues
- License
Tools
execute_csharp_script_in_unity_editor
Perform any task by executing generated C# scripts in Unity Editor context. Full access to UnityEngine, UnityEditor APIs, and reflection. Automatically captures logs, errors, and return values.
read_unity_console_logs
Read Unity Editor Console logs with configurable entry limits (1-1000, default 200)
run_unity_tests
Run Unity tests via TestRunnerApi. Supports EditMode, PlayMode, or both. Can run all tests or filter by fully qualified test names.
enter_play_mode
Enter Unity Play Mode, pause time and return immediately after triggering the transition. Intended to be used before gameplay automation tools.
play_unity_game
Temporarily unpause time, simulate configured Input System actions, collect logs, and pause again when finished.
get_unity_game_view_window_screenshot
Capture the current Unity Game View as an image without routing screenshot capture through gameplay input calls.
exit_play_mode
Exit Unity Play Mode, unpause time, and return immediately after triggering the transition.
get_unity_info
Returns information about the current Unity Editor project and the UnityCodeMcpServer settings.
Security considerations
This package executes LLM-generated C# code (including reflection code) with the same privileges as the Unity Editor process.
You are responsible for securing your environment and for any changes or data loss caused by executed scripts.
Architecture
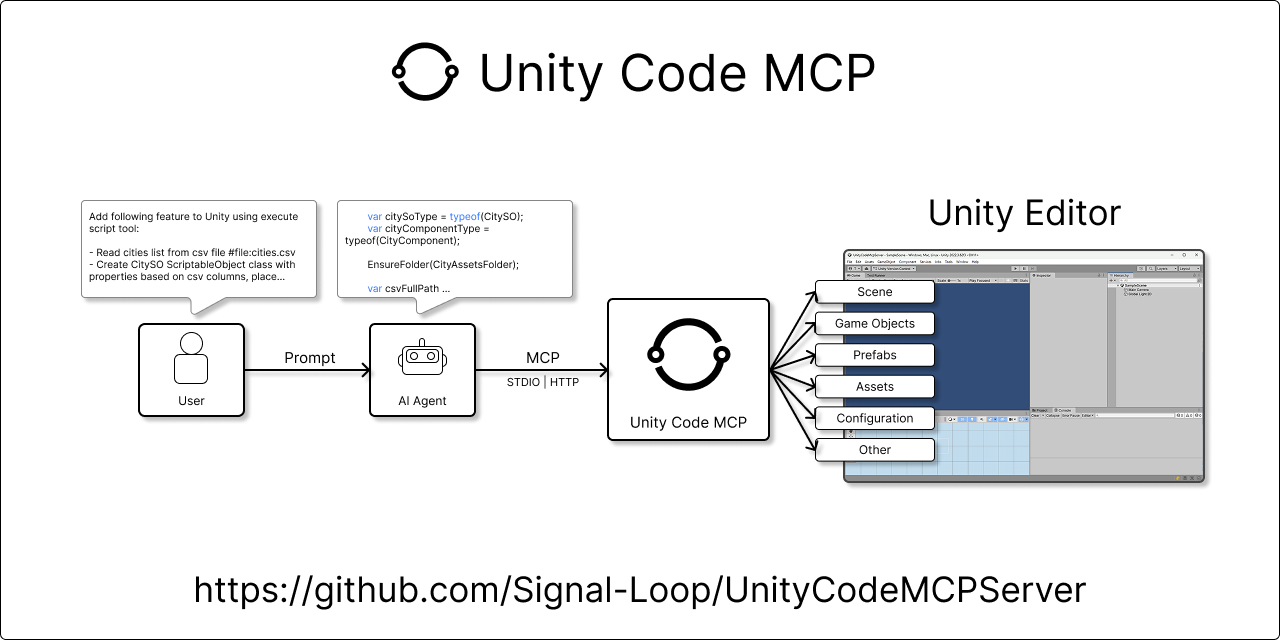
*Architecture diagram: The Unity Code MCP Server package runs inside the Unity Editor and communicates with an external MCP client (like an LLM agent) through a file-backed STDIO bridge.*
STDIO Transport
graph LR
    A["MCP ClientAI Agent"] -->|STDIO| B["STDIO BridgePython script"]
    B |request/response files| C["Unity Code MCP ServerUnity Editor"]

    style A fill:#e1f5ff
    style B fill:#fff3e0
    style C fill:#f3e5f5
Quick start
Requirements
- Unity 2022.3 LTS or higher (tested on 2022.3.62f3 and 6000.2.7f2)
- `uv` (Python package manager) for the bundled STDIO bridge: https://docs.astral.sh/uv/.
Installation
1. Install `uv`:
2. Install Unity Code MCP Server from Unity Package Manager. Open Window > Package Manager, click the + button, select Add package from git URL..., and enter:
https://github.com/Signal-Loop/UnityCodeMCPServer.git?path=Assets/Plugins/UnityCodeMcpServer3. Configure the skill install location. Open Tools/UnityCodeMcpServer/Show or Create Settings, scroll to the Skills section, and confirm or change the install directory. By default, first-time installs target `.agents/skills/`. Skills are installed and updated automatically when the package is installed or updated.
First Run
MCP client configuration
1. Open your Unity project. Unity auto-starts the file-backed transport and watches `.unityCodeMcpServer/messages` in the project root.
2. Configure your MCP client to run the bundled STDIO bridge.
STDIO
Example configuration (using `uv` to run the bridge):
The `unity-code-mcp-stdio` bridge forwards STDIO traffic to Unity through `.unityCodeMcpServer/messages`.
{
  "mcpServers": {
    "unity-code-mcp-stdio": {
      "command": "uv",
      "args": [
        "run",
        "--directory",
        "C:/path/to/UnityProject/Assets/Plugins/UnityCodeMcpServer/Editor/STDIO~",
        "unity-code-mcp-stdio"
      ]
    }
  }
}
Server configuration (Unity)
1. Access the settings via Tools/UnityCodeMcpServer/Show or Create Settings.
2. Configure Verbose Logging for detailed diagnostics and optionally set Input Actions Asset for `play_unity_game`.
The file-backed transport exchanges request and response files through `.unityCodeMcpServer/messages` in the Unity project root.
Menu commands
General
- Tools/UnityCodeMcpServer/Show or Create Settings — Open the server settings asset in the inspector
Agent skills
Unity Code MCP Server ships a set of AI agent skill files (Markdown documents that teach your agent how to use the server's tools effectively). These skills are installed automatically into the configured target directory whenever the package is installed or updated.
Installing skills
1. Open the server settings: Tools/UnityCodeMcpServer/Show or Create Settings.
2. Scroll to the Skills section.
3. Choose the install directory from the dropdown:
- `GitHub` targets `.github/skills/`
- `Claude` targets `.claude/skills/`
- `Agents` targets `.agents/skills/`
- `Custom` shows a folder picker so you can select any directory
4. The inspector shows the currently selected target directory label so you can verify exactly where skills will be copied.
5. Package install and update runs copy the skills automatically.
Only new or changed `.md` files are copied. Files that are already up to date (matching content hash) are skipped.
Included skills
| Skill | Description |
|---|---|
| `executing-csharp-scripts-in-unity-editor` | Teaches the agent when and how to use `execute_csharp_script_in_unity_editor`, `read_unity_console_logs`, and `run_unity_tests` together as a reliable pipeline. Covers forbidden patterns, debugging loops, and common scripting patterns. |
| `unity-game-player` | Teaches the agent how to play and test Unity games in a closed loop using `enter_play_mode`, `play_unity_game`, `execute_csharp_script_in_unity_editor`, `read_unity_console_logs`, and `exit_play_mode`. Covers scene discovery, math-based action timing, and adaptive re-sensing. |
Extending (adding tools)
Add Tools, Prompts, Resources, or Async Tools by implementing the relevant interfaces (ITool, IToolAsync, IPrompt, IResource) anywhere in your codebase. The server will automatically detect and register them.
Synchronous tool
using System.Collections.Generic;
using Newtonsoft.Json.Linq;
using UnityCodeMcpServer.Interfaces;
using UnityCodeMcpServer.Protocol;

public class EchoTool : ITool
{
    public string Name => "echo";

    public string Description => "Echoes the input text back to the caller";

    public JToken InputSchema => JsonHelper.ParseElement(@"{
            ""type"": ""object"",
            ""properties"": {
                ""text"": {
                    ""type"": ""string"",
                    ""description"": ""The text to echo""
                }
            },
            ""required"": [""text""]
        }");

    public ToolsCallResult Execute(JToken arguments)
    {
        var text = arguments.GetStringOrDefault("text", "");

        return ToolsCallResult.TextResult($"Echo: {text}");
    }
}
Asynchronous tool
using System.Collections.Generic;
using Newtonsoft.Json.Linq;
using UnityCodeMcpServer.Interfaces;
using UnityCodeMcpServer.Protocol;
using System.Threading.Tasks;

public class DelayedEchoTool : IToolAsync
{
    public string Name => "delayed_echo";

    public string Description => "Echoes the input text after a specified delay (demonstrates async tool)";

    public JToken InputSchema => JsonHelper.ParseElement(@"{
            ""type"": ""object"",
            ""properties"": {
                ""text"": {
                    ""type"": ""string"",
                    ""description"": ""The text to echo""
                },
                ""delayMs"": {
                    ""type"": ""integer"",
                    ""description"": ""Delay in milliseconds before echoing"",
                    ""default"": 1000
                }
            },
            ""required"": [""text""]
        }");

    public async Task ExecuteAsync(JToken arguments)
    {
        var text = arguments.GetStringOrDefault("text", "");
        var delayMs = arguments.GetIntOrDefault("delayMs", 1000);

        await Task.Delay(delayMs);

        return ToolsCallResult.TextResult($"Delayed Echo (after {delayMs}ms): {text}");
    }
}
Script execution context
By default, script execution context includes following assemblies:
- Assembly-CSharp
- Assembly-CSharp-Editor
- System.Core
- UnityEngine.CoreModule
- UnityEditor.CoreModule
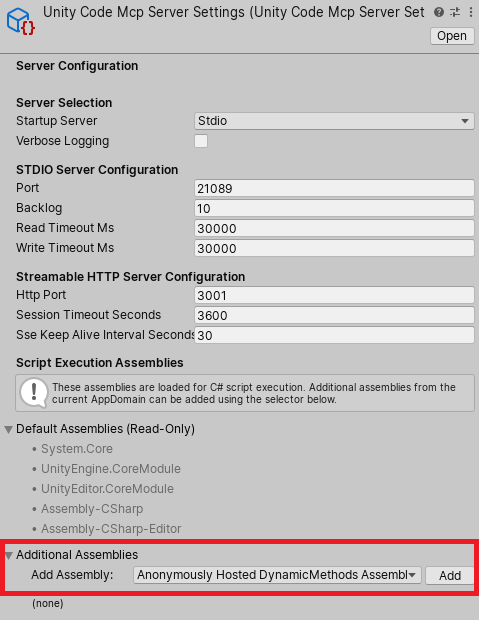
Unity Code MCP Server settings (Assets/Plugins/UnityCodeMcpServer/Editor/Resources/UnityCodeMcpServerSettings.asset) allow configuring additional assemblies to include in the script execution context. This is useful if your project has assemblies that your generated scripts need to reference.
To add additional assemblies use settings 'Additional Assemblies' section.
STDIO bridge
See the bridge docs at README_STDIO.md.
Testing
Unity tests are in `Assets/Tests/` and can be run via the Unity Test Runner.
Known Issues
GUID conflicts with existing dll files in the project
- Unity Code MCP Server includes dll files in its package. If those files are already present in your project, you may see GUID conflicts. In our test cases it does not cause any issues, but if you encounter problems, please fill issue: Issues. Removing duplicate dlls from your project may resolve the conflicts.
GUID [eb9c83041c7a89c46bb6e20eab4484df] for asset 'Packages/com.signal-loop.unitycodemcpserver/Editor/Bin/Microsoft.CodeAnalysis.CSharp.dll' conflicts with:
  '[Path to dll file in your project]/Microsoft.CodeAnalysis.CSharp.dll' (current owner)
We can't assign a new GUID because the asset is in an immutable folder. The asset will be ignored.
License
MIT
Frequently asked questions
What is UnityCodeMCPServer?
UnityCodeMCPServer is Unity Code MCP Server is a powerful tool for the Unity Editor that gives AI Agents ability to perform any action using Unity Editor API. This includes scripts, scenes, prefabs, assets, configuration changes, and more.
How do I install UnityCodeMCPServer?
Open the GitHub repository and follow its README. Most MCP servers are added to your client's MCP config, then called by your agent.
Is UnityCodeMCPServer open source?
Yes — it is hosted on GitHub at https://github.com/Signal-Loop/UnityCodeMCPServer and has 19 stars.
Related MCP tools
 Unity-MCP
AI Skills, MCP Tools, and CLI for Unity Engine. Full AI develop and test loop. Use cli for quick setup. Efficient token usage, advanced tools. Any C# method may be turned into a tool by a single line. Works with Claude Code, Gemini, Copilot, Cursor and any other absolutely for free.
 unity-mcp
Unity MCP acts as a bridge between AI assistants and your Unity Editor. Give your LLM tools to manage assets, control scenes, edit scripts, and automate tasks within Unity.
 unity-mcp
An MCP server that allows MCP clients like Claude Desktop or Cursor to perform actions in the Unity Editor C#-based implementation.
 mcp-unity
Model Context Protocol (MCP) plugin to connect with Unity Editor — designed for OpenAI, Gemini, Claude, Deepseek and Grok interoperability
 pg-aiguide
MCP server and Claude plugin for Postgres skills and documentation. Helps AI coding tools generate better PostgreSQL code.
 atlassian-mcp-server
Official remote MCP server for Atlassian. Securely connect Jira, Confluence, Jira Service Management, Bitbucket, and Compass to Claude, ChatGPT, Cursor, VS Code, and other AI tools using OAuth 2.1 or API tokens.
Run your own MCP server? See who uses it and what to fix.
Measure it with TrackMCP